Webshop Category Synchronization
The webshop category synchronization module allows webshop owners to import or update new webshop categories from various types of source files.
The administration screen for webshop category synchronization can be accessed via the administrative sidebar under Synchronizations Management → Synchronizations → Webshop Categories.
# – the identifier of the synchronization process.
Name – the name of the synchronization process.
Source Type – indicates the type of synchronization source, whether the data is pulled from a source file, link, or FTP.
Schedule Type – specifies when and how often the synchronization should run.
Active – indicates whether the synchronization is active or not. Deactivated synchronization processes will not run, even at the scheduled time.
Last Run – the exact date and time when the synchronization was last executed.
Last Run Status – the status of the result of the last synchronization run.
Actions:
"Synchronize Now" – this button immediately triggers the synchronization, regardless of its scheduled time.
"Edit" – clicking the edit button allows administrators to modify existing synchronization processes.
"Delete" – if a synchronization process is no longer needed, it can be easily deleted by clicking the red "trash can" icon.
Store owners can search for a specific synchronization process by typing its name in the search bar and clicking the "magnifying glass" icon.
New synchronization processes can be created at any time by clicking the "Add New" button.
Adding and Editing Webshop Category Synchronizations
The Basic Settings, Scheduling Settings, and Source Settings were already covered in the chapter titled "General Settings for All Synchronizations" in this documentation.
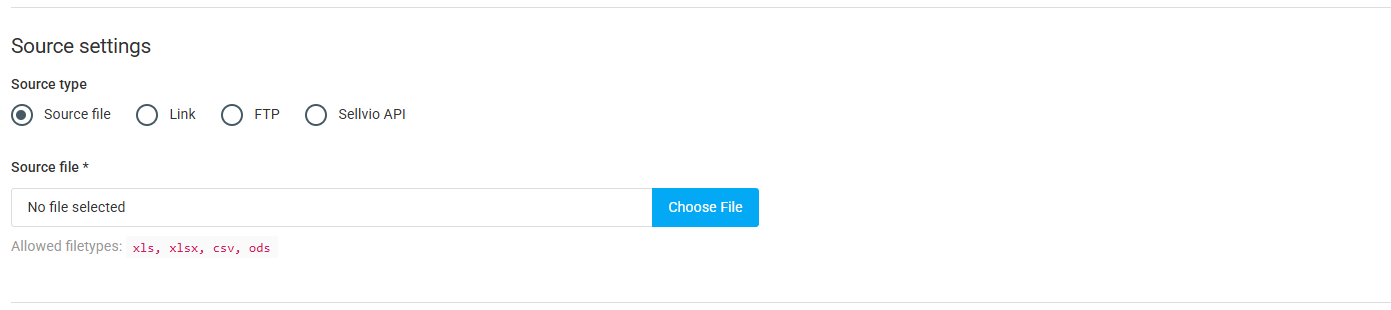
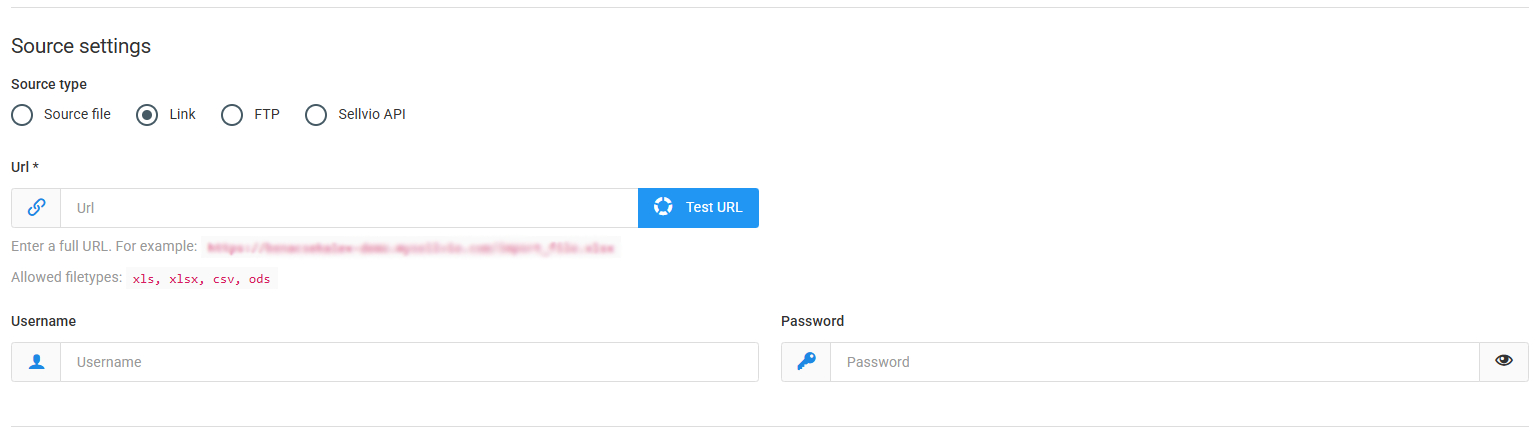
In the source settings, it is possible to select the data source, based on which the source can be configured.
Source file
Source file – uploading the data file
Link
- URL – Full address of the data source.

- Test URL – Button to check if the URL works.
- Username – User ID required for connection.
- Password – Password required for connection.
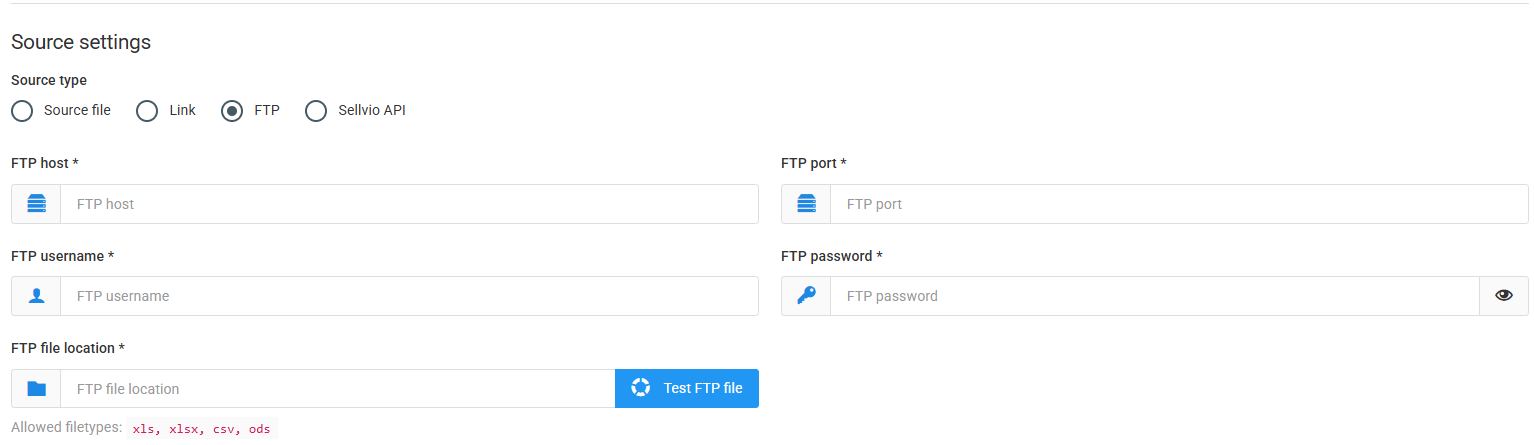
- FTP
- FTP host – The address of the FTP server.
- FTP port – The port for the FTP connection.
- FTP username – Username required for FTP access.
- FTP password – Password for FTP access.
- FTP file location – Path to the file on the FTP server.
- Test FTP file – Button to check the availability of the specified file.
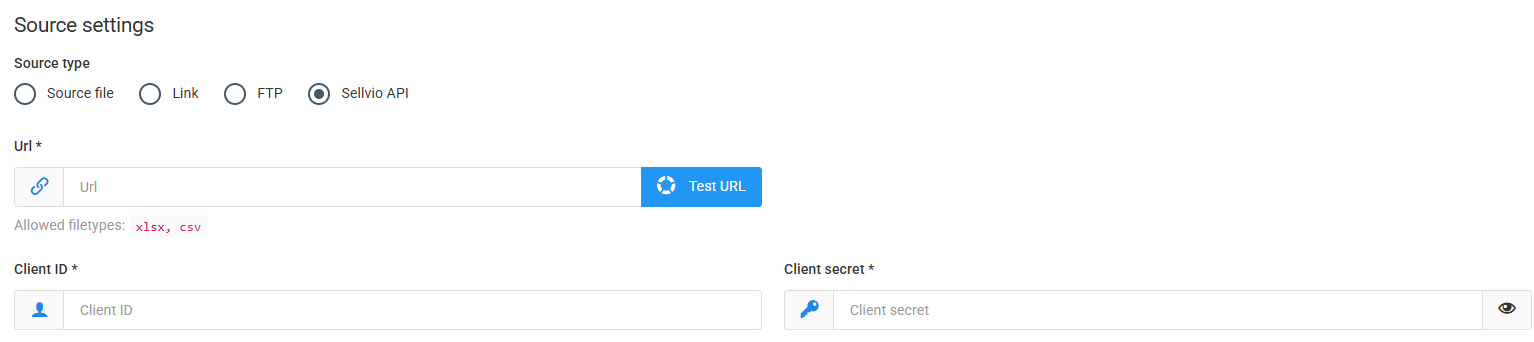
- Sellvio API
- URL – The address of the data source.
- Test URL – Button to check if the URL is working.
- Client ID – Identifier required for the API.
- Client secret – Security key required for the API.
Activating the Add Only toggle prevents the system from updating existing webshop categories in the system whose identifiers are present in the source file. While this toggle is active, the synchronization process will only create new webshop categories from the source file whose identifiers do not yet exist in the system.
In this chapter, we will review the remaining configuration options that are exclusively available for webshop category synchronization.
Store owners need to create a mapping between the fields where the data will be imported and the columns in the source document. This can be done by entering the column names into the column fields next to each data type.
ID - the unique identifier of the webshop category in the Sellvio system. The identifier must be specified in the source document. Rows without an identifier will fail to synchronize.
Existing webshop categories can be updated by providing the webshop category identifier in the source document.
To create a new webshop category in Sellvio during the synchronization process, the source document must include an identifier that does not yet exist in the system.
Parent Category Identifier - The identifier of an already existing webshop category in Sellvio. If the specified identifier does not exist in Sellvio, the synchronization of that row will fail.
Parent category name - the name of a parent category already existing in Sellvio.
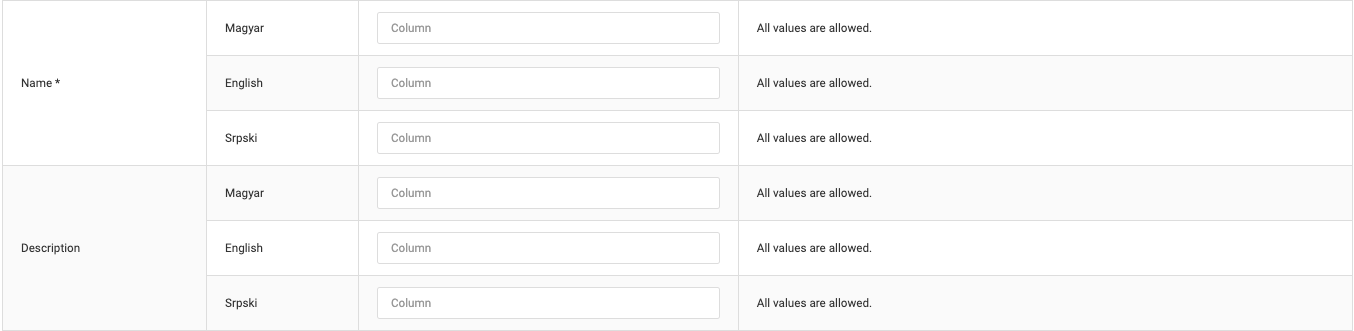
- Name - The webshop category name is read from the columns specified in the "Name" section. The name of the webshop category must be provided in the source file for every language available in the webshop. Otherwise, the row will not be imported, as webshop categories cannot be saved without a name.
- Description — the webshop category description is read from the columns specified in the "Description" section.
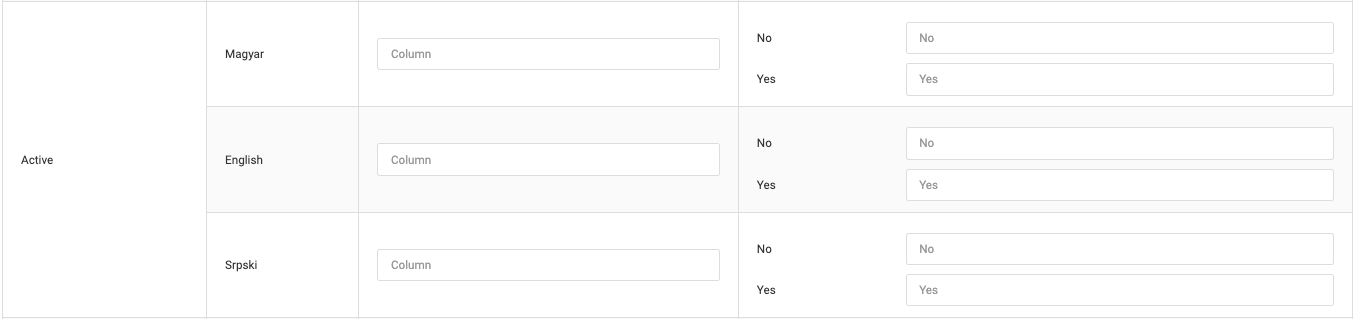
Active - In the "Active" section, webshop owners can specify which columns the synchronization process should use to determine whether the webshop category should be enabled for specific languages.
The "No" and "Yes" fields serve to inform Sellvio which values in the source document represent the "no" and "yes" values. The synchronization process looks for the values entered here.
The "No" and "Yes" fields indicate which values in the source document represent "no" and "yes," respectively. The synchronization process will look for the values specified here.
Product Image Synchronization
The product image synchronization module allows webshop owners to update the images of existing products in their webshop.
The product image synchronization administration screen is accessible via the administration sidebar under Synchronization Management → Synchronizations → Product Image.
- # - The identifier of the synchronization process.
- Name - The name of the synchronization process.
- Source Type - Indicates the source type for synchronization, specifying whether the data is retrieved from a source file, link, or FTP.
- Schedule Type - Specifies when and how frequently the synchronization should run.
- Active - Indicates whether the synchronization is active or not. Deactivated synchronization processes will not run, even at the scheduled time.
- Last Run - The exact date and time of the last synchronization run.
- Last Run Status - The status of the outcome of the last synchronization run.
- Actions:
- "Run Synchronization Now" - This button immediately triggers the synchronization, regardless of whether it is scheduled for another time.
- "Edit" - Clicking the edit button allows administrators to modify existing synchronization processes.
- "Delete" - If a synchronization is no longer needed, it can be deleted by clicking the red "trash bin" icon.
- Store owners can search for a specific synchronization process by entering its name in the search bar and clicking the "magnifying glass" icon.
- New synchronization processes can be created at any time by clicking the "Add New" button.
- Adding and Editing Product Image Synchronizations
The Basic Settings, Schedule Settings, and Source Settings were already covered in the chapter titled General Settings for All Synchronizations in this documentation.
In this chapter, we will examine the remaining settings that are exclusively available for Product Image Synchronization.
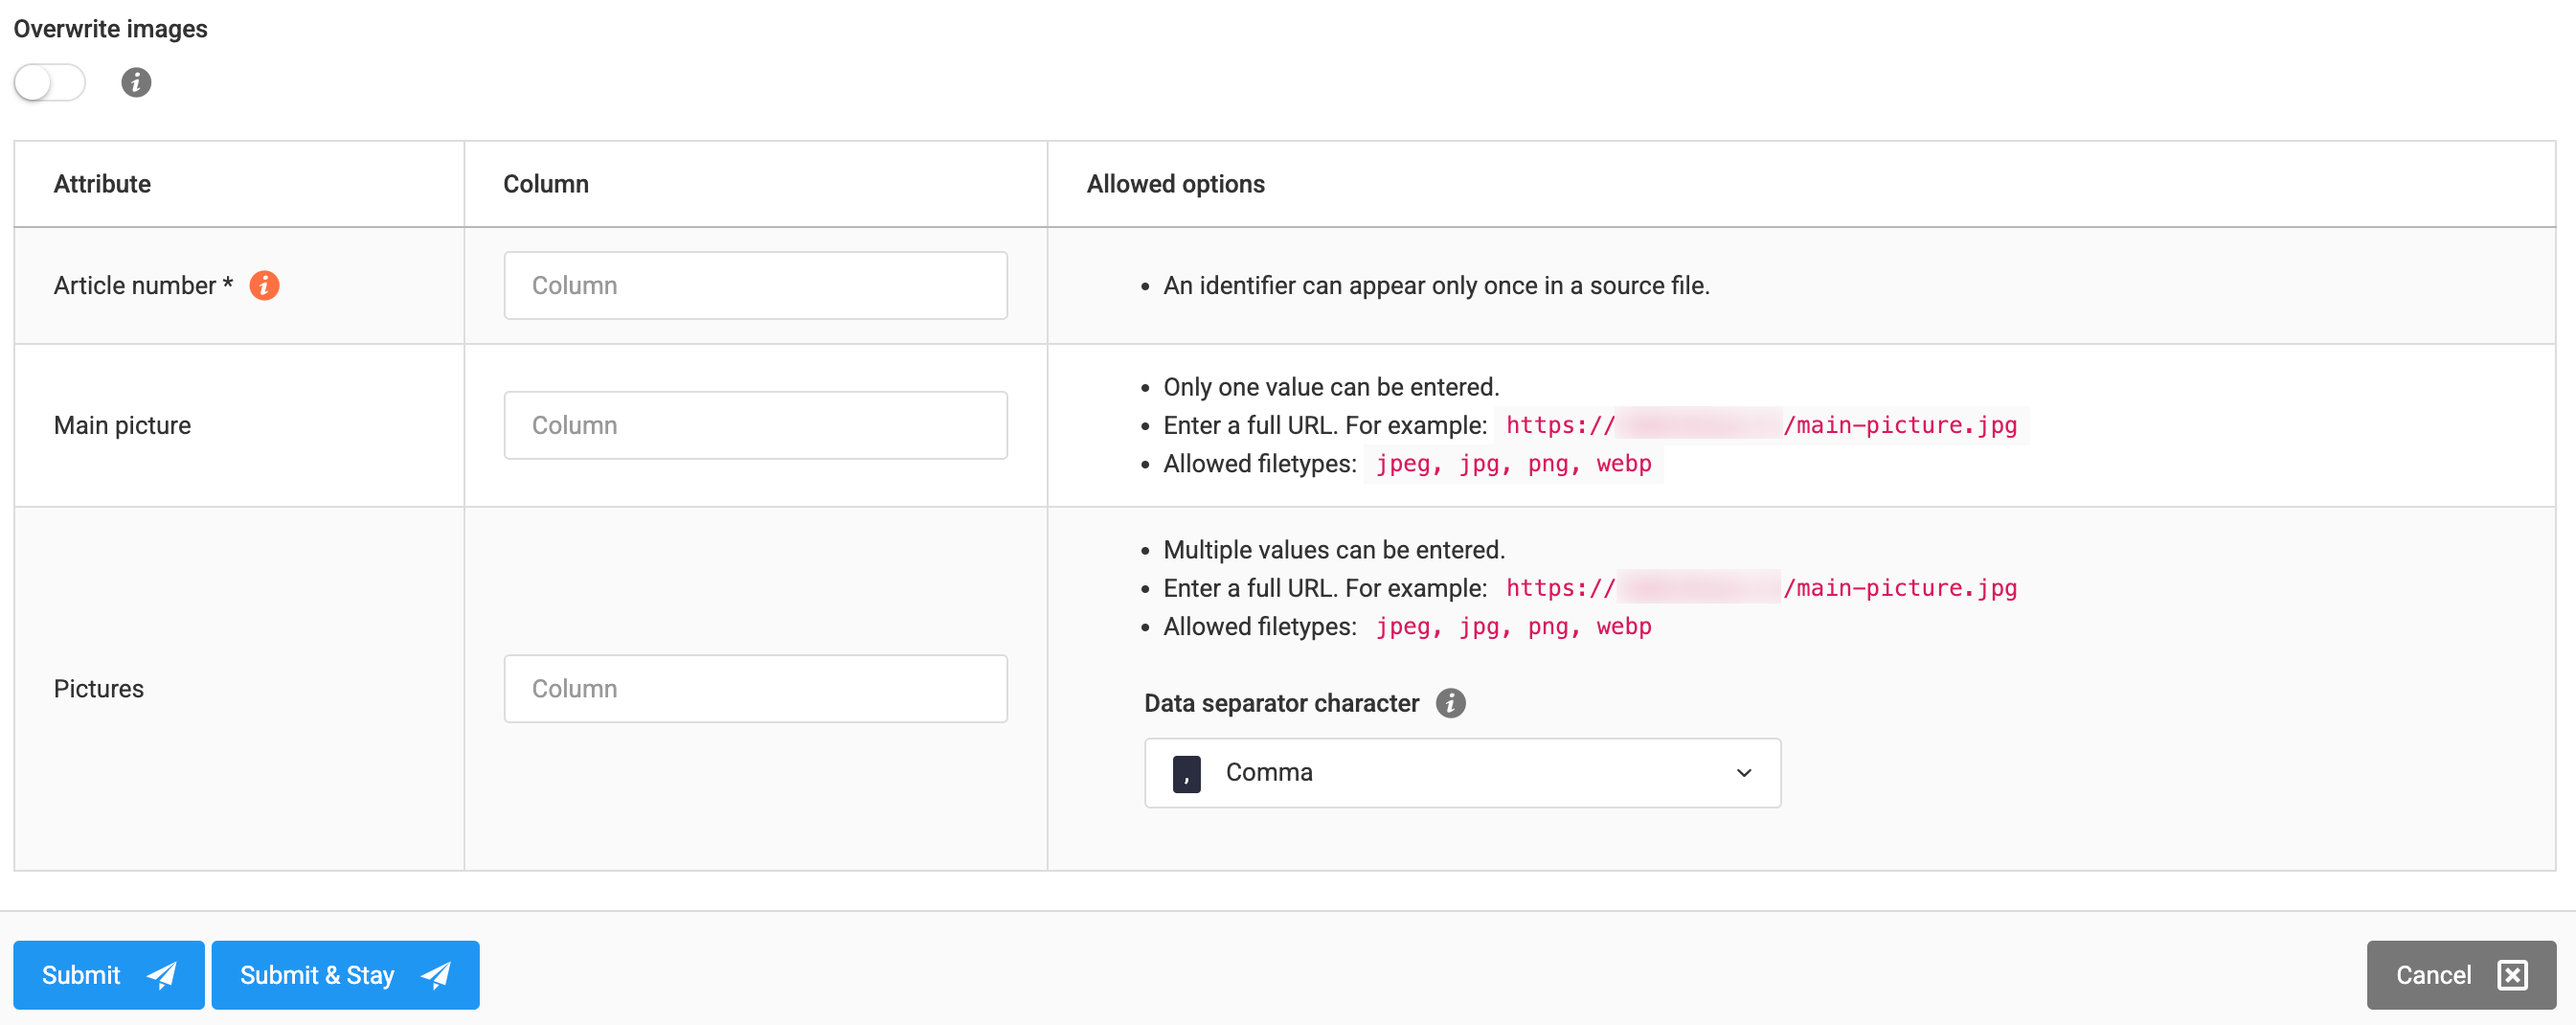
Store owners must create a mapping between the fields into which the data will be imported and the columns in the source document. This can be achieved by entering the column names into the field next to each data type.
- Overwriting Images - If this setting is enabled, the synchronization process will delete all product images not listed in the source file. This option is useful for completely replacing the product's images. If the option is disabled, the synchronization process will only add the images from the import file to the product while leaving the existing product images untouched.
- SKU - The product's SKU is used to locate the corresponding product in the system. Rows without an SKU will fail to synchronize.
- Main Image - The URL of the image to be imported as the product's main image. Only one image URL can be assigned as the main product image. Supported image formats: jpeg, jpg, and png.
- Images - URLs of the images to be imported and added to the product. Multiple URLs can be specified in the source file, separated by commas. Supported image formats: jpeg, jpg, and png.

If the same image URL appears multiple times in the Images column, it will only be imported once.
If the same image URL is listed in both the Main Image and Images columns, the image will only be imported once. Since it is first listed in the Main Image column, it will automatically be set as the product's main image.
Product Synchronization
The product synchronization module allows online store owners to import new products or update existing products in the store.
The product synchronization administrative screen can be accessed from the administrative sidebar under Manage Synchronizations → Synchronizations → Product.
- # – the identifier of the synchronization process.
- Name – the name of the synchronization process.
- Source Type – indicates the type of synchronization source, specifying whether the data is fetched from a file, a link, or FTP.
- Schedule Type – indicates when and how often the synchronization should run.
- Active – indicates whether the synchronization process is active or not. Deactivated processes will not run, even at their scheduled time.
- Last Run – the exact date and time of the last synchronization run.
- Last Run Status – the status of the result of the last synchronization run.
- Actions:
- "Run Synchronization Now" – this button initiates the synchronization immediately, regardless of any other scheduled time.
- "Edit" – clicking the edit button allows administrators to modify existing synchronization processes.
- "Delete" – if a synchronization is no longer needed, it can be easily deleted by clicking the red "trash bin" icon.
- Store owners can search for a specific synchronization process by entering its name in the search field and clicking the "magnifying glass" icon.
- New synchronization processes can be created at any time by clicking the "Add New" button.
- Adding and Editing Product Synchronizations
The Basic Settings, Schedule Settings, and Source Settings have already been covered in the "General Settings for All Synchronizations" chapter of this documentation.
In this chapter, we will review the remaining configuration options that are exclusively available for Product Synchronization.
Store owners must create a mapping between the fields where the data will be imported and the columns of the source document. This can be done by entering the column names into the respective column fields next to each data type.
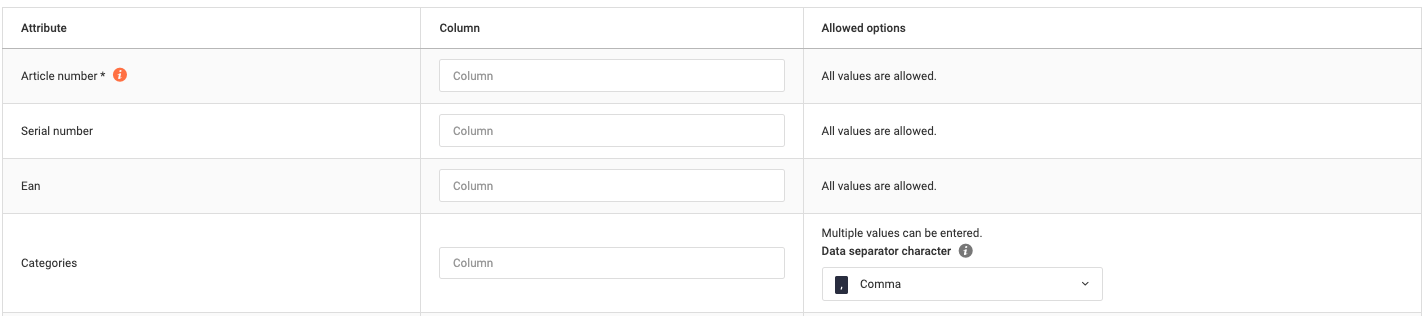
- Article number — the product's SKU is used to find the outgoing product in the system.
- If the item number specified in the source file is found in the system, Sellvio updates the product with the data from the source file.
- If the item number specified in the source file is not found, Sellvio creates a new product in the system using the data provided in the source file.
- Serial Number – The serial number to be assigned to the product.

- EAN – The EAN number to be assigned to the product.
- Categories — the names of the categories to which the product is assigned, separated by commas. The category names may be in any of the languages supported by the webshop, however they must already exist in the system before the product synchronization runs. If a category is not found, it is automatically skipped.
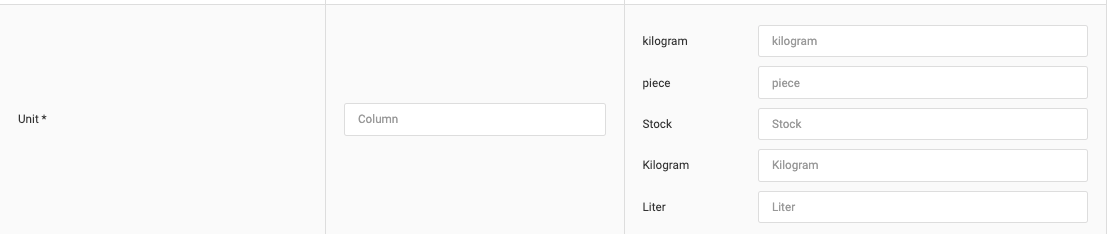
Units - in the "Units" section, store owners can specify the column from which the product's unit is read during synchronization. It also lists all the units in the system, allowing administrators to designate the Excel equivalent of each unit. This function is essential, especially when the source document uses a different term for a given unit.
Orderable - this section is used to control the product's orderable availability directly from the source document. Administrators must define the specific values in the source document that correspond to the "Yes" and "No" values.
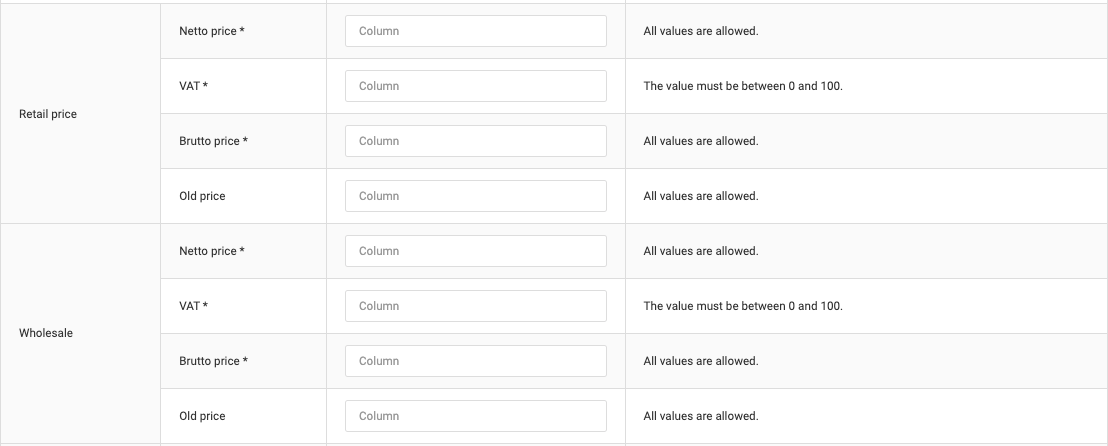
The Prices section lists all pricing structures used in the web store. All products in Sellvio must have prices in each pricing structure. Any row in the source document where the product prices are not properly specified will be skipped.
- Net Price – The product's net price in a specific pricing structure (mandatory).
- VAT – The value-added tax (VAT) applicable to the product price (mandatory).
- Gross Price – The product's gross price in a specific pricing structure (mandatory).
- Old Price — the net price of the product in a given pricing.

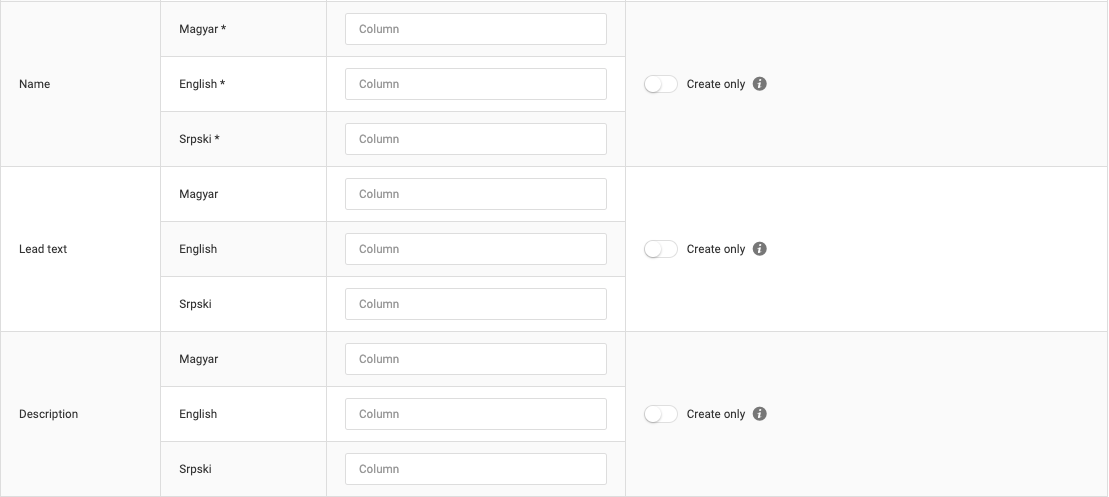
This section is used to map the product name, description, and short text fields to the corresponding columns in the source file for each language.
The product name must be provided in the source file for each language. Otherwise, the row will not be processed during synchronization.
- Name – The product name in all supported languages of the web store (mandatory).
- Description – The product description text in all supported languages of the web store.
- Description — The description of the icon in all supported webshop languages..
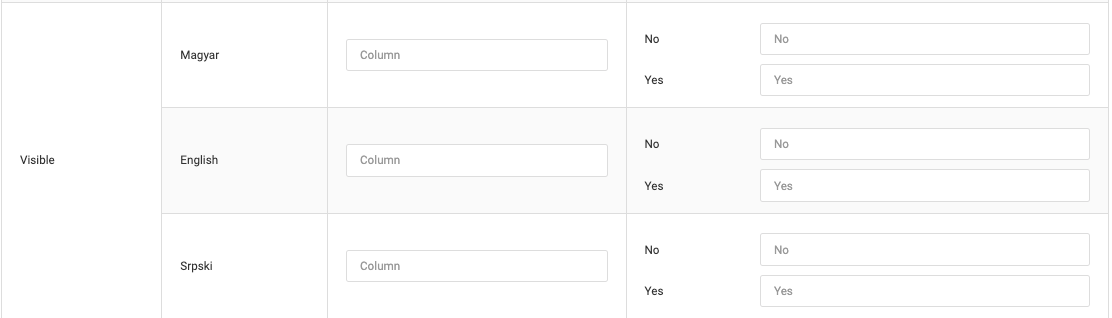
Visible - in this section you can control the product's visibility separately for each supported language in the webshop, directly from the source document. Administrators must define the specific values in the source document that correspond to the "Yes" and "No" values.
Custom URL – Optionally, store owners can specify alternative custom URL addresses for the same product category. Multiple custom URLs can be defined for each supported language in the web store, separated by commas.
Adding and Editing User Synchronizations
The Basic Settings, Schedule Settings, and Source Settings have already been covered in the section titled "General Settings for All Synchronizations" in this documentation.
In this chapter, we will explore the remaining settings that are exclusively available for User Synchronizations.
- # – The identifier of the synchronization process.
- Name – The name of the synchronization process.
- Source Type – Indicates the source type of the synchronization, specifying whether the data is pulled from a source file, link, or FTP.
- Schedule Type – Specifies when and how often the synchronization should run.
- Active – Indicates whether the synchronization process is active or not. Deactivated synchronization processes will not run, even at the scheduled time.
- Last Run – The exact date and time when the synchronization was last executed.
- Last Run Status – The result status of the last synchronization execution.
- Actions:
- "Run Now" – This button immediately starts the synchronization process, regardless of its scheduled time.

- "Edit" – Clicking the edit button allows administrators to modify existing synchronization processes.
- "Delete" – If a synchronization is no longer needed, it can be deleted by clicking the red "trash" icon
- Store owners can search for a specific synchronization process by entering its name in the search bar and clicking the "magnifying glass" icon.
- New synchronization processes can be created at any time by clicking the "Add New" button.
- Adding and editing user synchronizations
The General Settings, Schedule Settings, and Source Settings have already been covered in the "General Settings for All Synchronizations" section of this documentation.
In this section, we will examine the remaining configuration options exclusively available for User Synchronization.
Store owners need to map fields between the data being imported and the corresponding columns in the source document. This mapping can be performed by entering the column names into the designated field next to each data type.
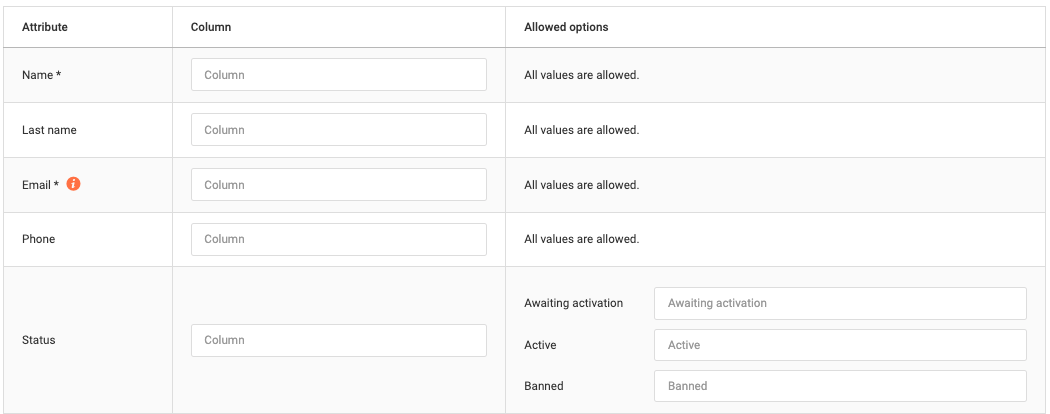
- Name - The name of the user to be imported or updated. Users cannot be saved without a name. The user's name must be provided in the source file; otherwise, the synchronization process will skip the row.
- First Name - The first name of the user to be imported or updated.
- Email — the e-mail address of the user to be imported or updated. Users are tracked in Sellvio based on their e-mail address, and without it data cannot be saved.
- If the email address already exists in the database, the synchronization process updates the user's information with the data provided in the source document.
- If the email address does not exist in the database, the synchronization process creates a new user with the email address and the data provided in the source document.
- Phone - The phone number of the user to be imported or updated.
- Status - Sellvio users can have one of three statuses: Inactive, Active, or Blocked.
The information listed above constitutes the minimum requirements for importing or updating users through the synchronization process.
However, Sellvio also enables store owners to specify a billing address and a shipping address for users to be imported or updated during the synchronization process.
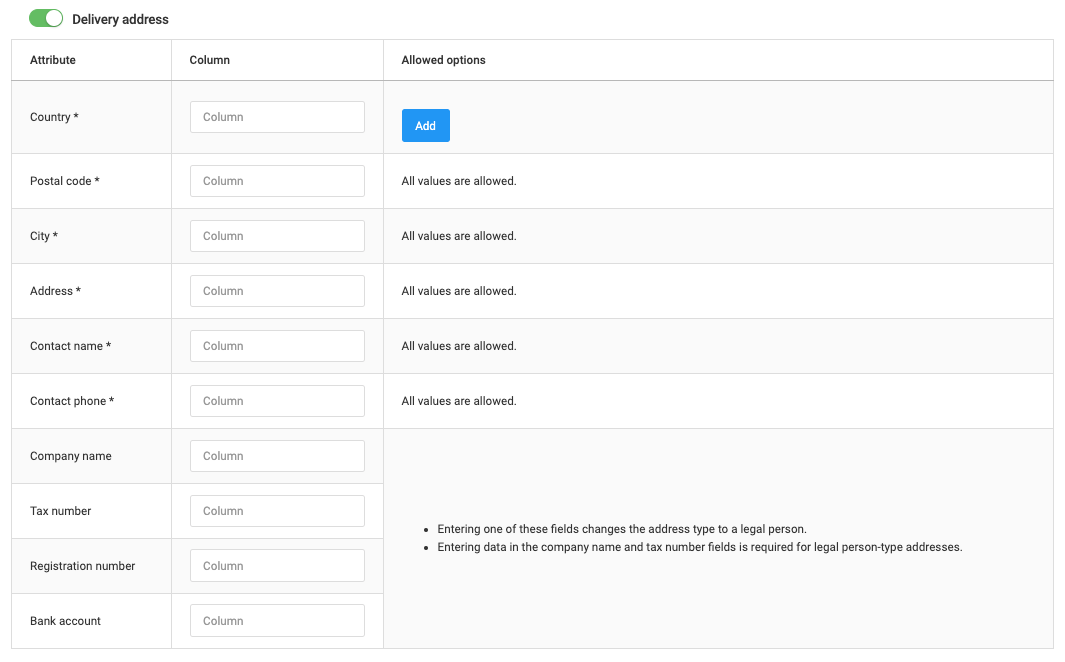
Enabling the Shipping Address option reveals the Shipping Address fields, allowing administrators to map the Sellvio fields to the appropriate fields available in the source document.
If administrators decide to include address imports, they should be aware that nearly every field related to addresses must have a mapping and corresponding data provided to ensure successful processing.
- Country — the Country section allows administrators to specify which column the Country is read from, how the countries used in the source document are labelled, and which country they are linked to in Sellvio (e.g. in the source document the country "Hungary" is called "HUN").
- Postal — the postal code of the address type to be imported.
- City — the city of the address type to be imported.
- Address — the street address and house number of the address type to be imported.
- Contact person's name — the name of the contact person belonging to the address (especially important for delivery addresses).
- Kapcsolat telefon — the phone number of the contact person belonging to the address (especially important for shipping addresses).

Company-Related Information
NON-LEGAL ENTITY - If no associations are provided for the company data, the imported address will be stored as a private address.
LEGAL ENTITY - When importing an address for a legal entity, associations must also be provided for the company-related fields.
- Company Name: The name of the company, essentially the name of the legal entity. This is a mandatory field; if the Company Name is missing from the source document, synchronization for the corresponding row will fail.
- Tax Number: The tax identification number of the legal entity; if the tax number is missing from the source document, synchronization for the corresponding row will fail.
- Registration Number: The registration number of the legal entity.
- Bank Account: The bank account number of the legal entity (this supplementary information is useful when generating invoices).
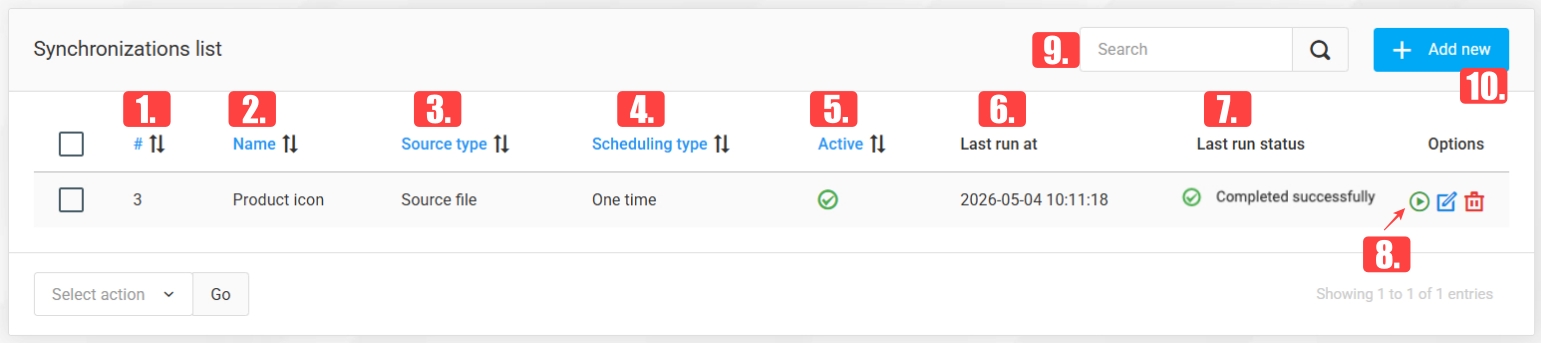
- Product icon synchronization
The icon synchronization module allows webshop owners to import new icons or update existing product icons in the webshop.
The “Product Icon Synchronization” admin screen can be accessed from the admin sidebar under: Synchronization Management → Synchronizations → Product Icons
- # – the identifier of the synchronization process.
- Name – the name of the synchronization process.
- Source type – indicates whether the data is retrieved from a file, link, or via FTP.
- Schedule type – defines when and how often the synchronization should run.
- Active – indicates whether the synchronization is active. Deactivated processes will not run, even at scheduled times.
- Last run at – the exact date and time of the last execution.
- Last run status – the result status of the last synchronization.
- Actions:
- “Synchronize Now” – immediately starts the synchronization, regardless of its schedule.
- “Edit” – allows administrators to modify existing synchronization processes.
- “Delete” – removes a synchronization by clicking the red trash icon.
- Shop owners can search for a specific synchronization process by entering its name into the search field and clicking the magnifying glass icon.
- New synchronization processes can be created at any time by clicking the “Add New” button.
- Adding and Editing Product Image Synchronizations
Shop owners need to create a mapping between the fields where data will be imported and the columns in the source document. This can be done by entering the column names into the “Column” field next to each data type.
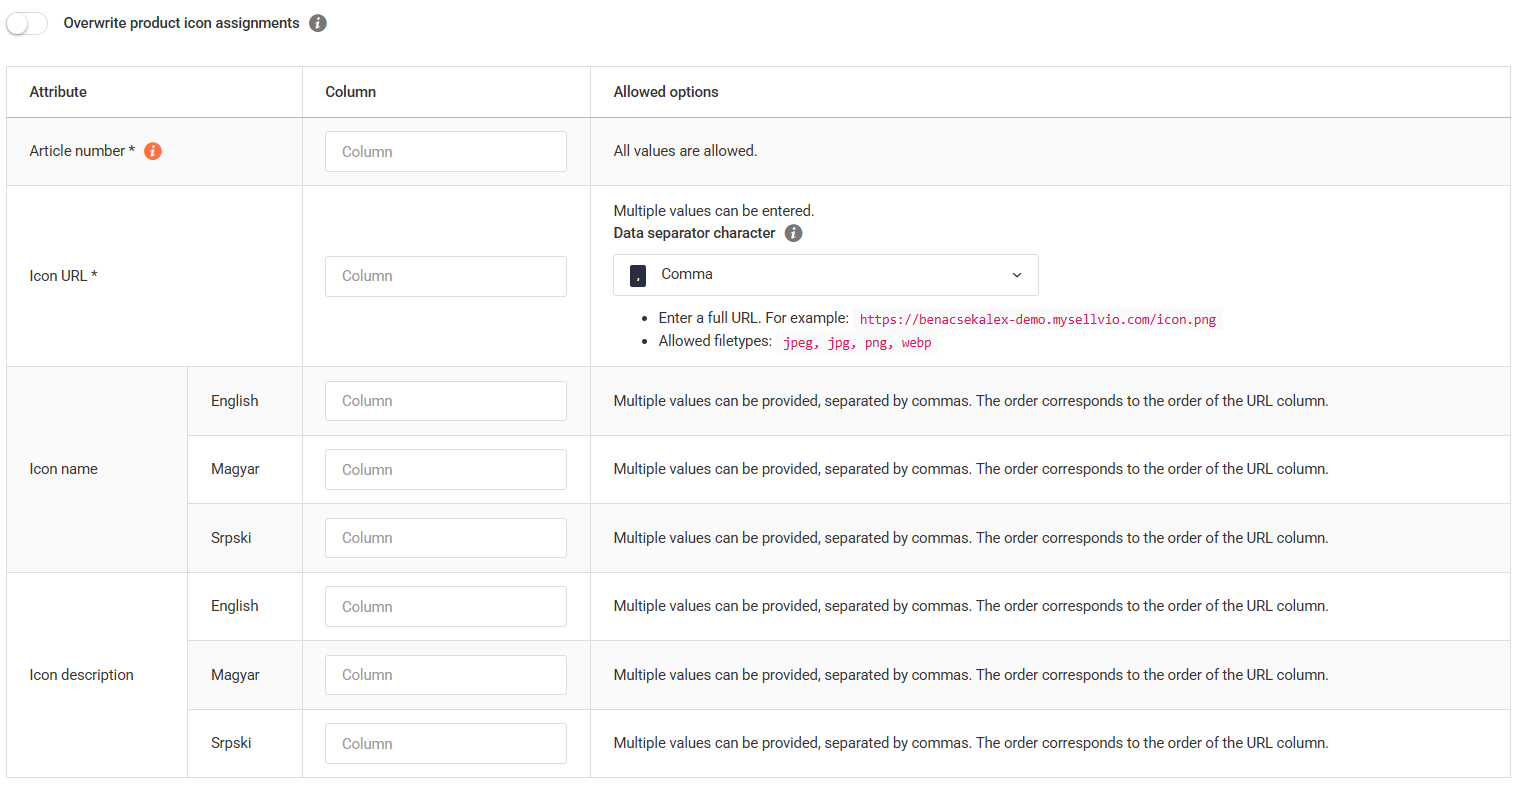
- Overwrite product icon assignment – If this option is enabled, the synchronization process deletes all product icons that are not present in the source file. This is useful when you want to completely replace product icons. If the option is disabled, the synchronization process only adds icons from the import file, leaving existing icons unchanged.
- Article number — the product's SKU is used to find the outgoing product in the system.
- If the SKU from the source file exists, Sellvio updates the product with the provided data.
- If the SKU does not exist, Sellvio creates a new product using the data from the source file.

- Icon URL – The URLs of the icons to be imported and assigned to the product. Multiple URLs can be provided in the source file, separated by commas. Supported image formats: jpeg, jpg, png, webp.
- Icon name – The name of the icon in all supported webshop languages.
- Icon description – The description of the icon in all supported webshop languages.
- Filter synchronization
The filter synchronization module allows webshop owners to import new filters or update existing filters in the webshop.
The “Filter Synchronization” admin screen can be accessed from the admin sidebar under: Synchronization Management → Synchronizations → Filters
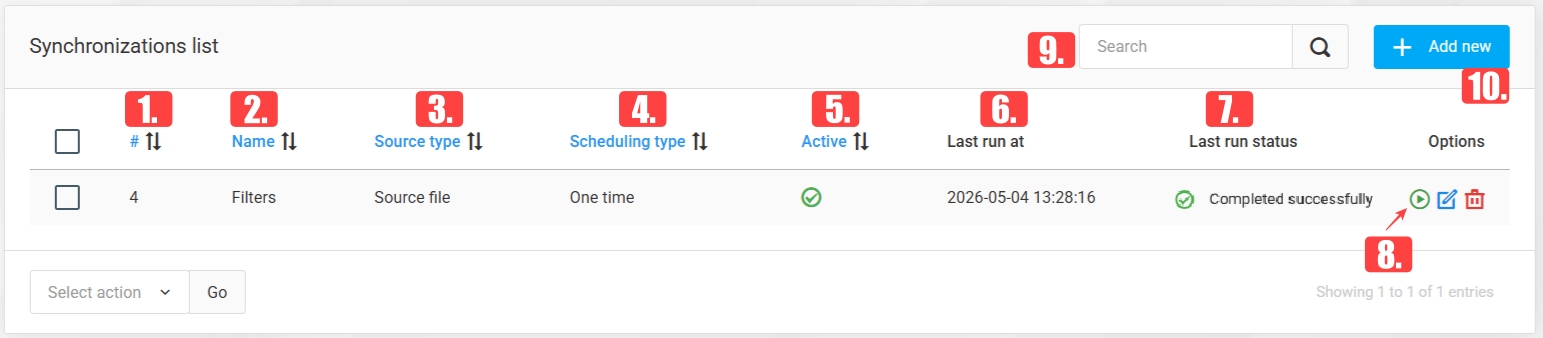
- # – the identifier of the synchronization process.
- Name – the name of the synchronization process.

- Source type – indicates whether the data is retrieved from a file, link, or via FTP.
- Schedule type – defines when and how often the synchronization should run.
- Active – indicates whether the synchronization is active. Deactivated processes will not run, even at scheduled times.
- Last run at – the exact date and time of the last execution.
- Last run status – the result status of the last synchronization.
- Actions:
- “Synchronize Now” – immediately starts the synchronization, regardless of its schedule.
- “Edit” – allows administrators to modify existing synchronization processes.
- “Delete” – removes a synchronization by clicking the red trash icon.
- Shop owners can search for a specific synchronization process by entering its name into the search field and clicking the magnifying glass icon.
- New synchronization processes can be created at any time by clicking the “Add New” button.
- Adding and Editing Product Image Synchronizations
Shop owners need to create a mapping between the fields where data will be imported and the columns in the source document. This can be done by entering the column names into the “Column” field next to each data type.
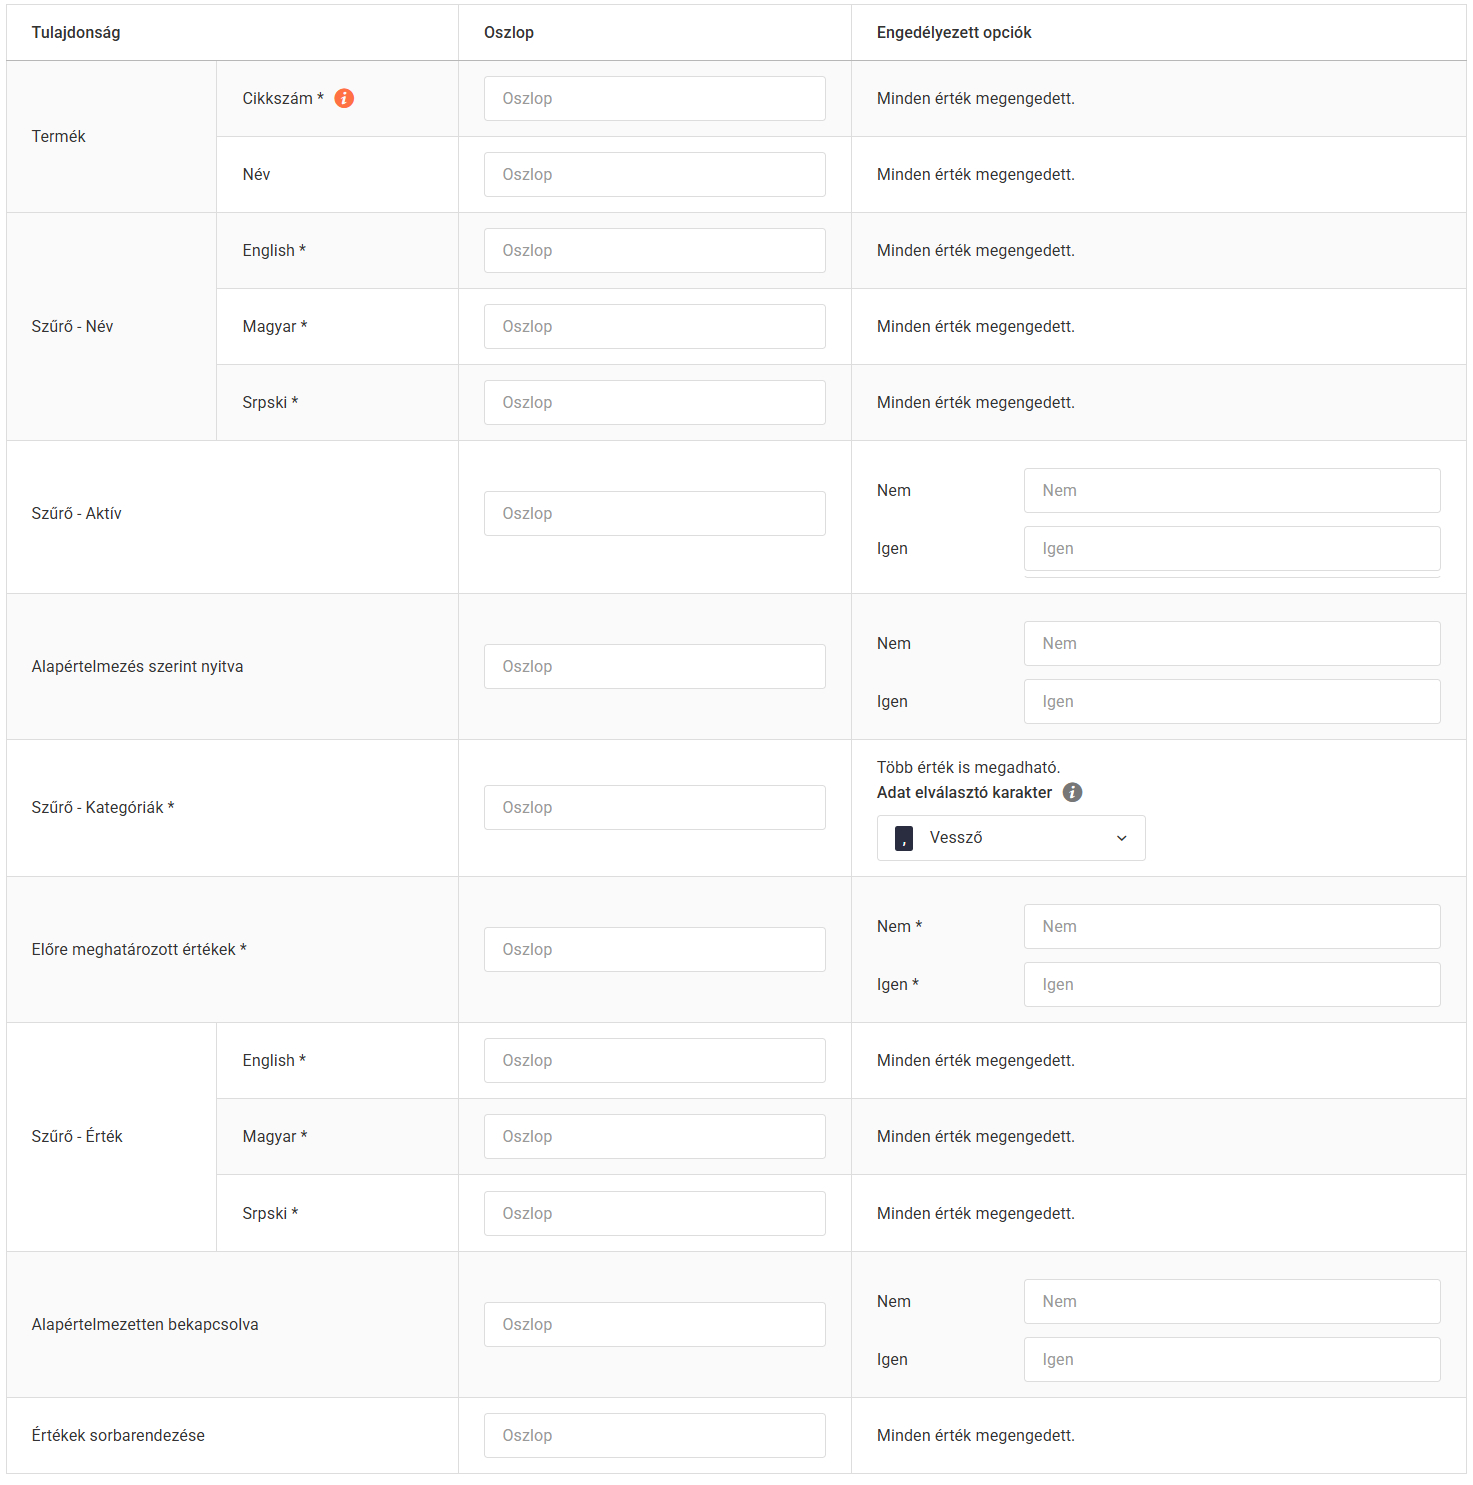
Product - SKU – the product's unique SKU. Based on this the system identifies which product the filter should be assigned to. Entering the SKU is mandatory.
Product - Name – the product name. This can serve as an additional identifier or information.
Filter - Name - The filter name can be entered in the languages used in the webshop
Adding and editing filter synchronizations
Shop owners need to create a mapping between the fields where data will be imported and the columns in the source document.
Filter - Categories - Here you can specify in which webshop categories the filter is displayed.
Predefined values - This determines whether the filter values come from a predefined list.
Filter - Value - The specific value of the filter can be entered in the webshop languages
Enabled by default - This determines whether the given filter value should be switched on by default.
This can be done by entering the column names into the “Column” field next to each data type.
Product Variation Synchronization
The product variation synchronization module allows webshop owners to create relationships between products as variations.
The administration screen for product variation synchronization can be accessed from the admin sidebar under Synchronization Management → Synchronizations → Product Variation.
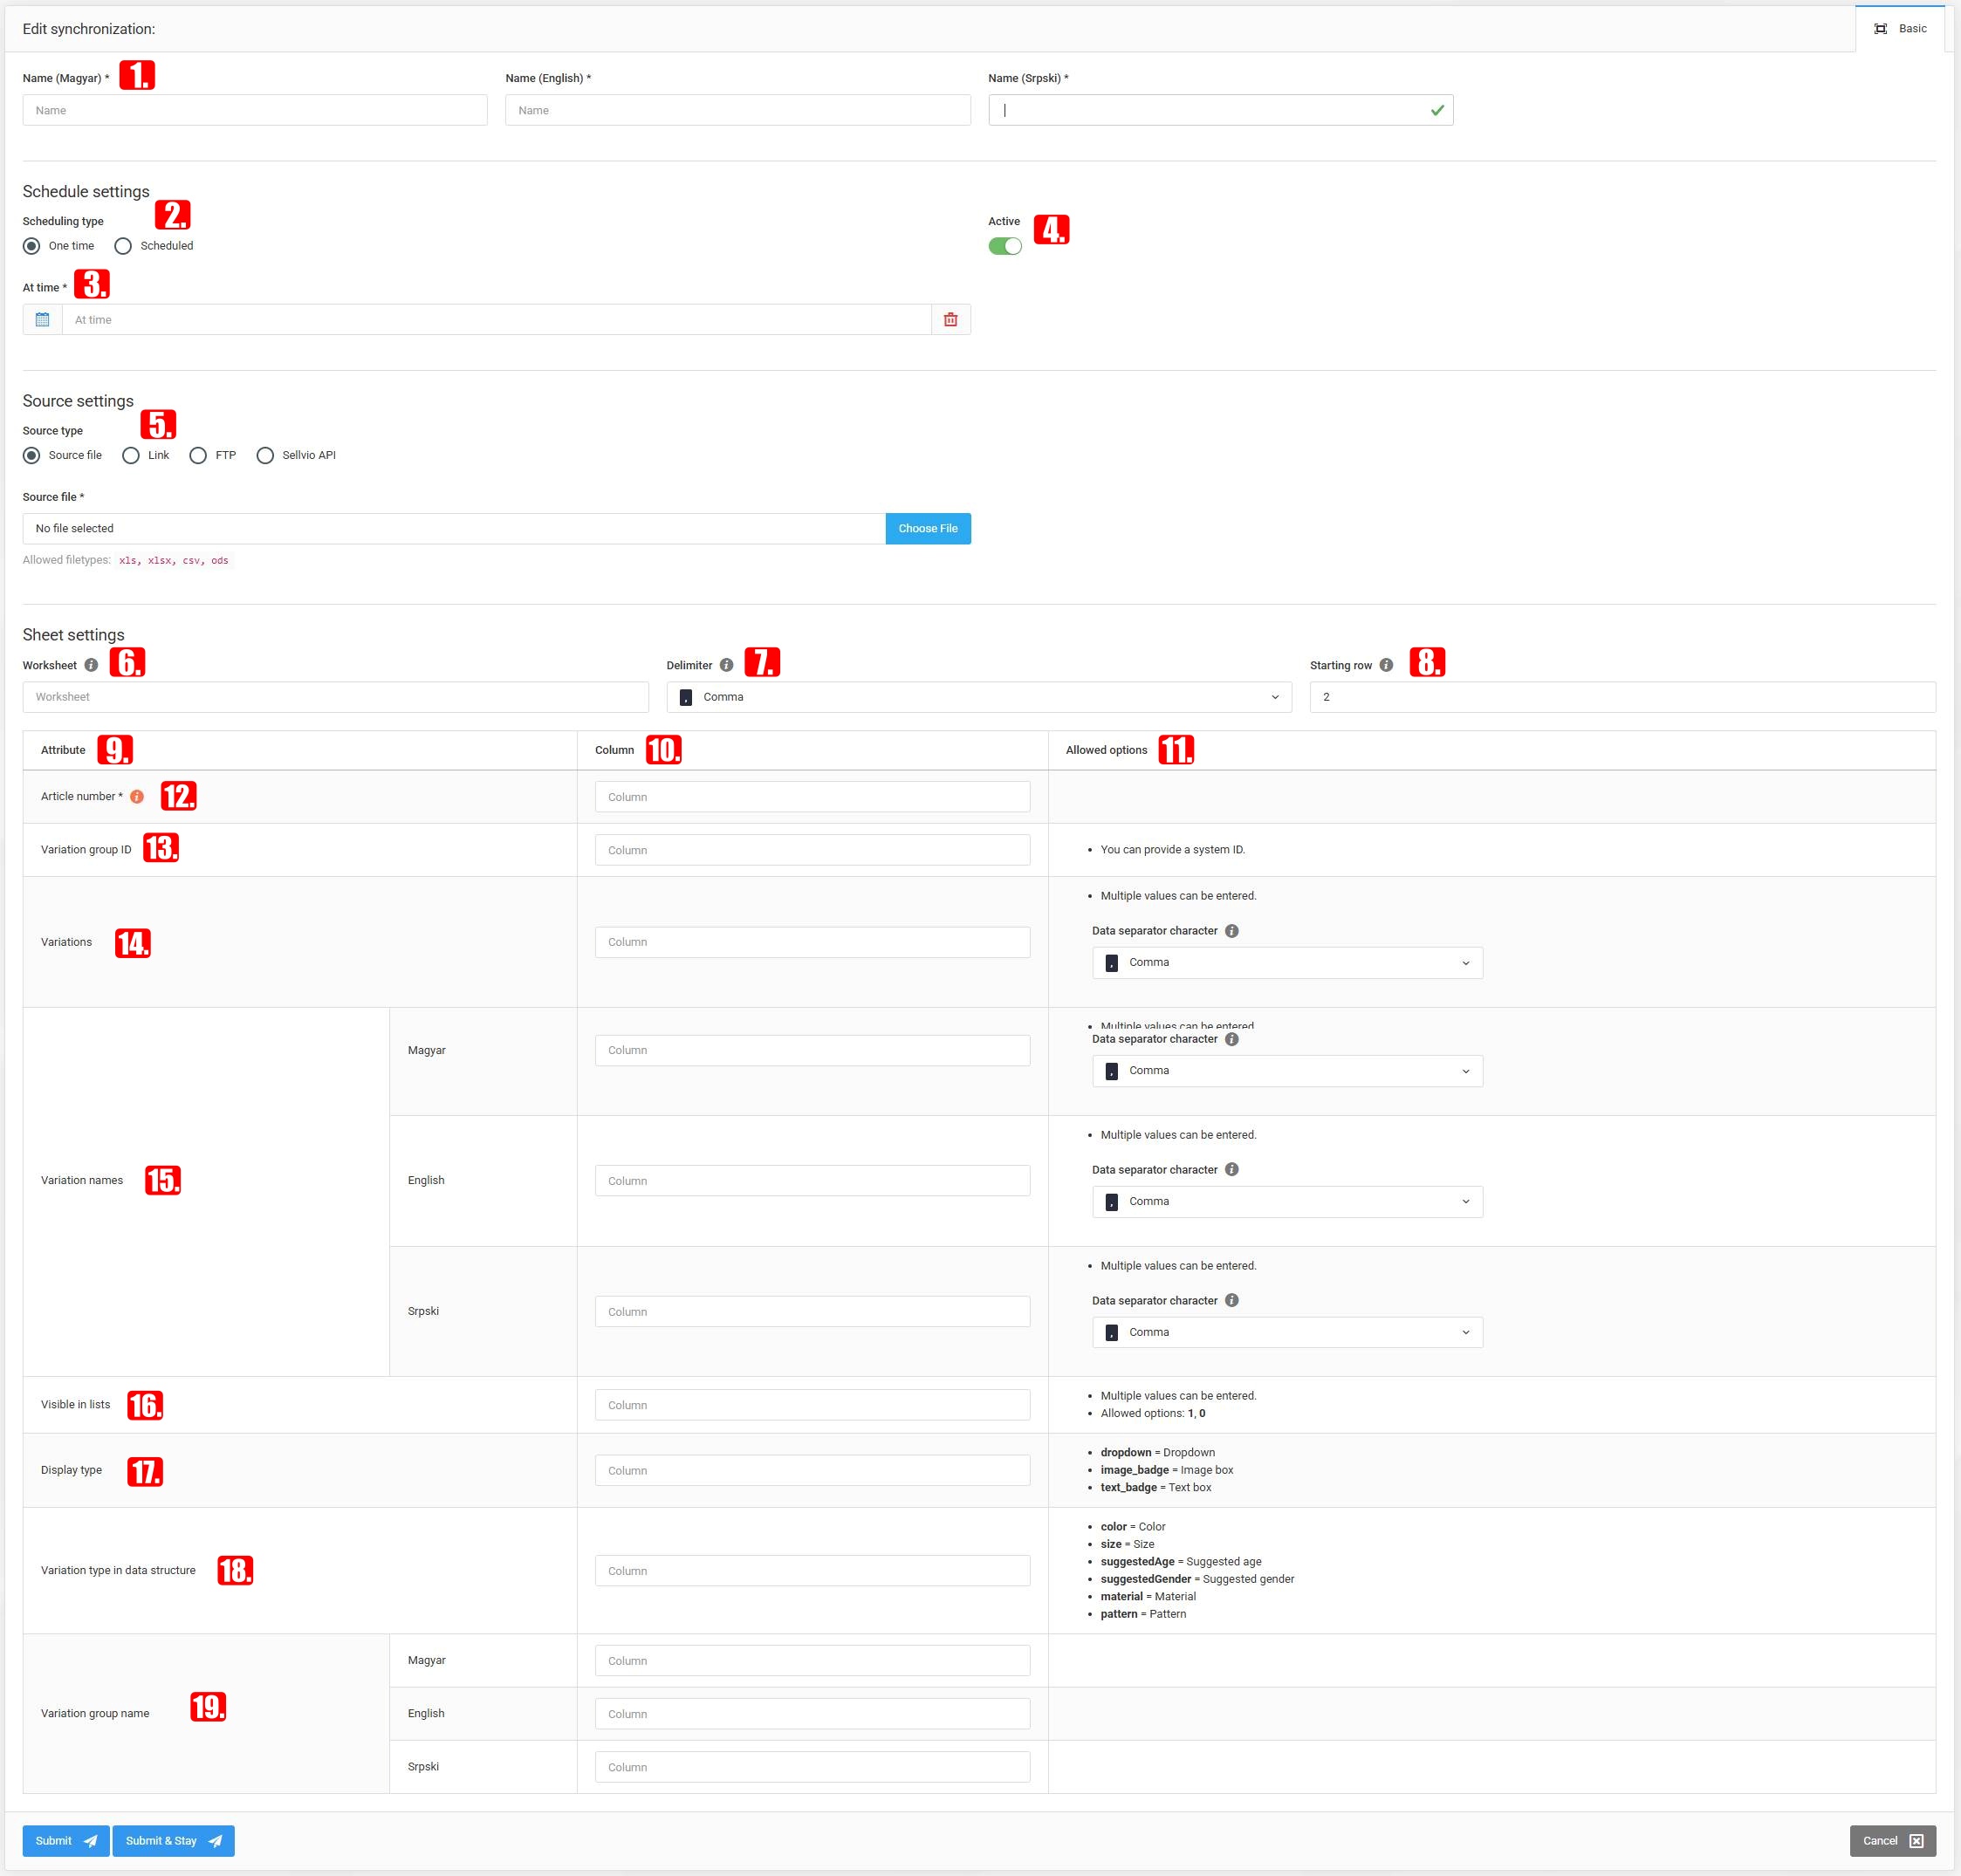
- Name – the name of the synchronization process.
- Scheduling type – indicates when and how often the synchronization should run.
- At time – allows you to select when the synchronization should be executed.
- Active – indicates whether the synchronization is active or not. Deactivated synchronization processes will not run, even at the scheduled time.
- Source type – indicates the type of synchronization source, whether data is retrieved from a source file, link, or FTP.
- Worksheet – specify which worksheet contains the synchronization table.
- Delimiter – allows you to select the delimiter used to separate listed values.
- Starting row – specify the row number from which the system should begin reading data.
- Attribute – shows which value must be entered in the given row.
- Column – specify which value is located in which column.
- Allowed options – additional options can be specified here.
- Article number – the product SKU is used to locate the existing product in the system. Rows without an SKU will fail synchronization.
- Variation group ID – specify the identifier of the variation created under the product in the system.
- Variations – list the SKUs of the product variations.
- Variation name – specify the variation names in the same order as the product SKUs.
- Visible in lists – mark with 1 or 0 which variations should be visible or hidden, listed in the same order as the product SKUs.
- Display type – select whether the variation should appear as a dropdown, image box, or text box.
- Variation type in data structure – select the variation type, which can be color, size, recommended age, recommended gender, material, or pattern.
- Variation group name – specify the variation group name for each active language
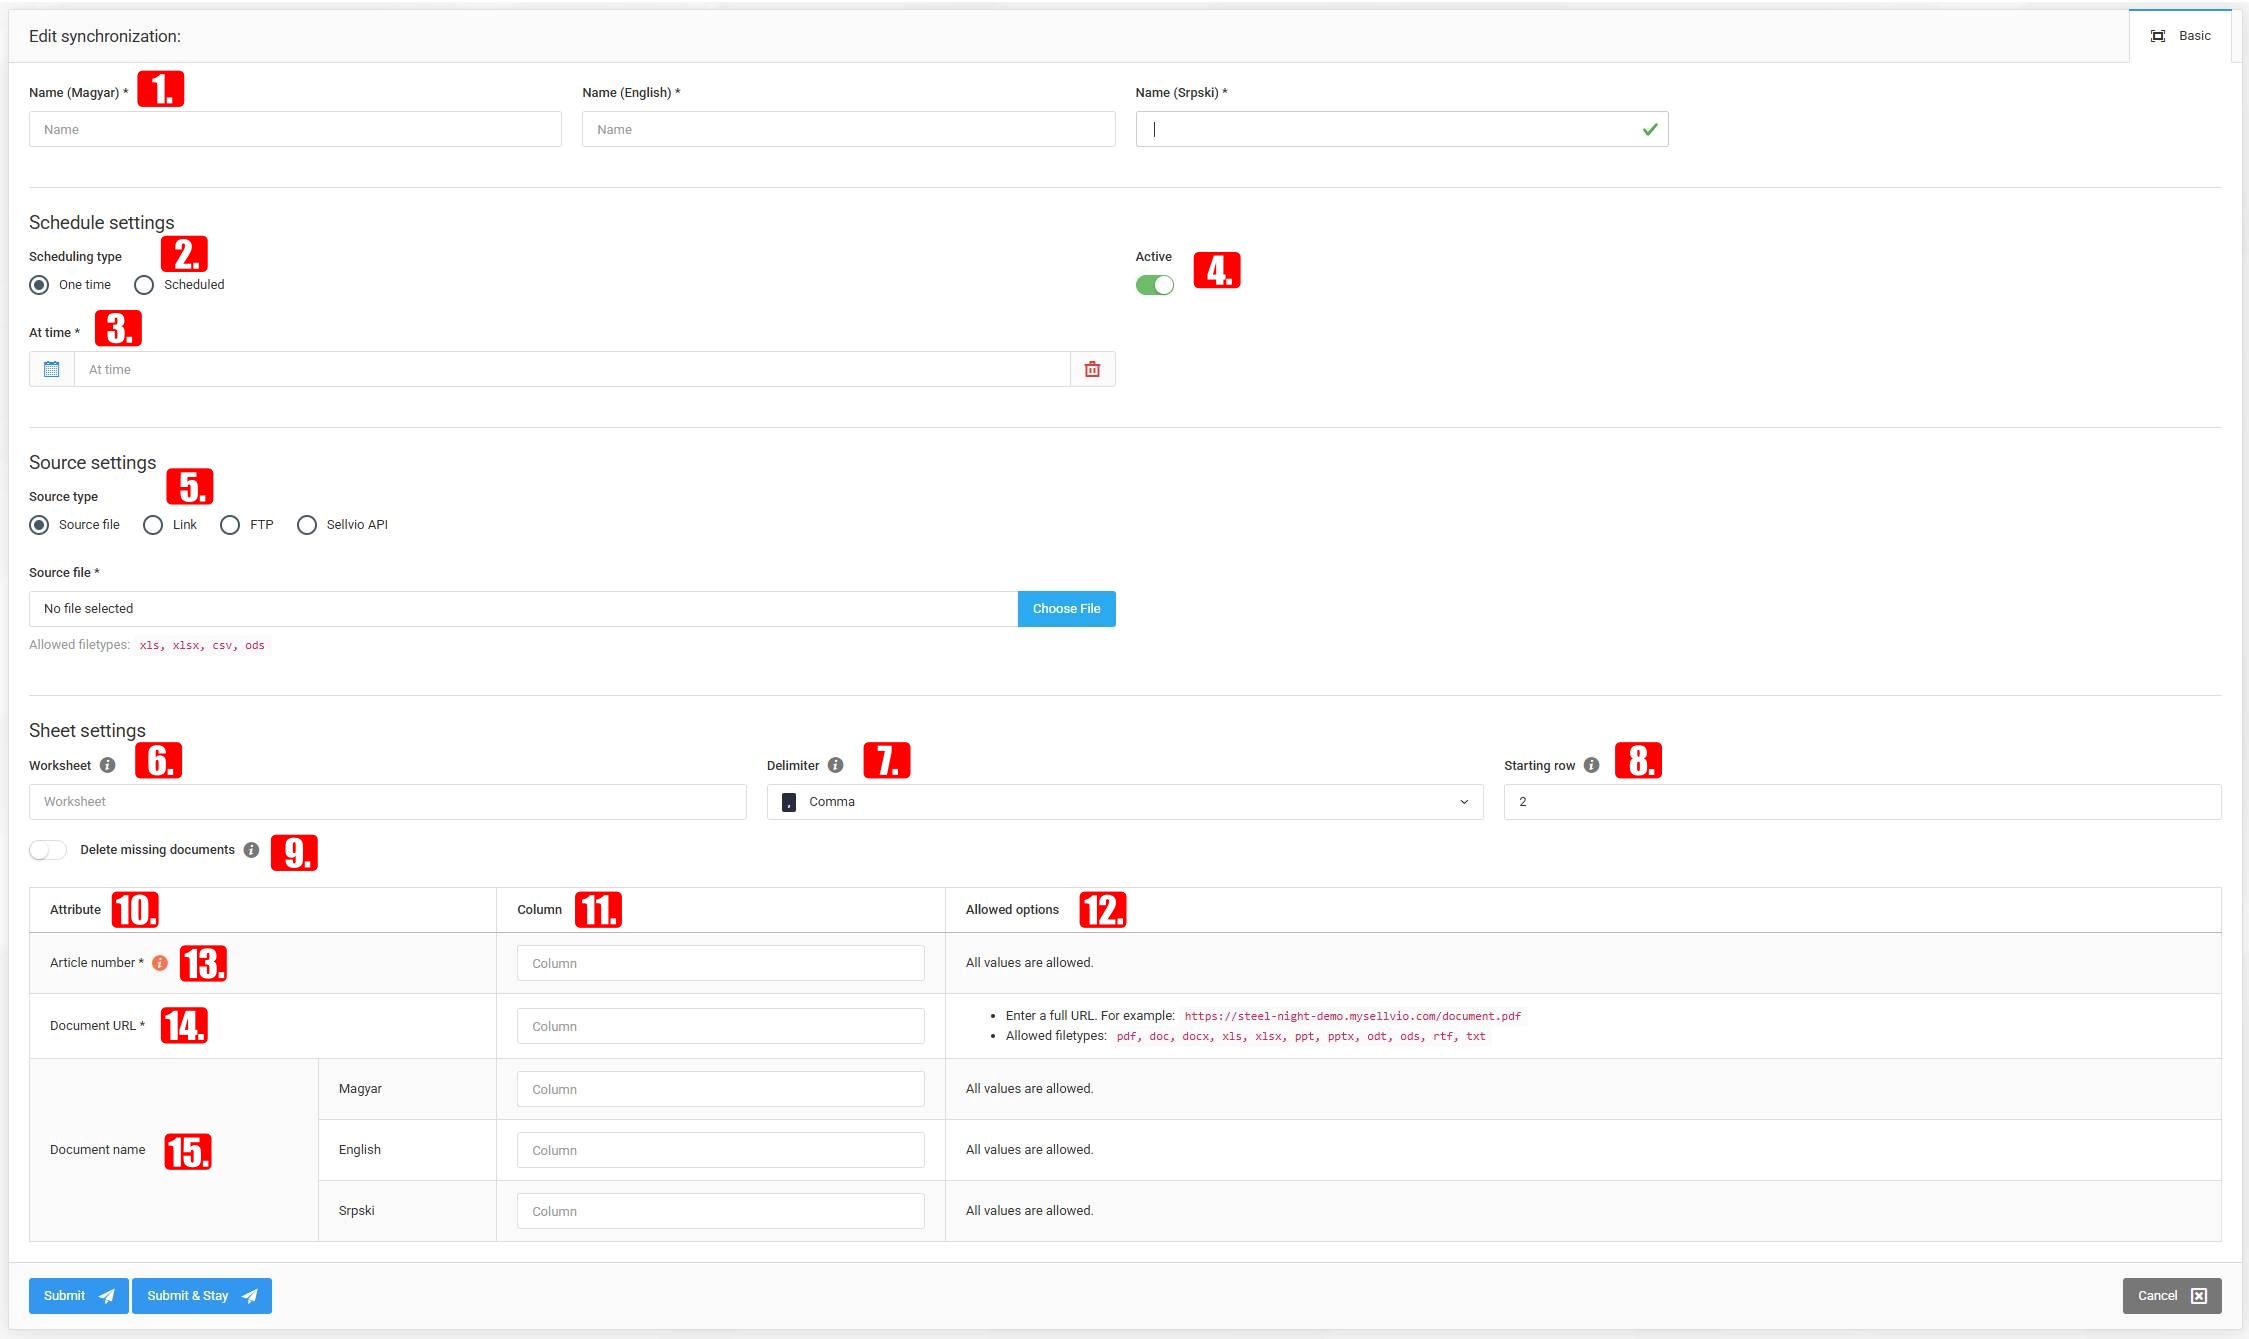
Starting the synchronization is performed in the same way as with other synchronization processes.
Product Document Synchronization
The product document synchronization module allows webshop owners to update or add documents to specific products.
The administration screen for product document synchronization can be accessed from the admin sidebar under Synchronization Management → Synchronizations → Product Document.
- Name – the name of the synchronization process.
- Scheduling type – indicates when and how often the synchronization should run.
- At time – allows you to select when the synchronization should be executed.
- Active – indicates whether the synchronization is active or not. Deactivated synchronization processes will not run, even at the scheduled time.
- Source type – indicates the type of synchronization source, whether data is retrieved from a source file, link, or FTP.
- Worksheet – specify which worksheet contains the synchronization table.
- Delimiter – allows you to select the delimiter used to separate listed values.
- Starting row – specify the row number from which the system should begin reading data.
- Delete missing documents – if this option is enabled, documents attached to the product but missing from the synchronization table will be deleted.
- Attribute – shows which value must be entered in the given row.
- Column – specify which value is located in which column.
- Allowed options – additional options can be specified here.
- Article number – the product SKU is used to locate the existing product in the system. Rows without an SKU will fail synchronization.
- Document URL – specify the link where the document is uploaded.
- Document name – specify the name that should appear on the product page
Starting the synchronization is performed in the same way as with other synchronization processes.
Synchronization Log
While the synchronization list provides brief feedback on the results of each synchronization, Sellvio includes a dedicated administration page where administrators can thoroughly review the outcomes of each completed process.
The Synchronization Log administration screen can be accessed from the administration sidebar under Manage Synchronizations → Synchronization Log.
- ID - The identifier number assigned to the synchronization process run.
- Name - The name of the synchronization process.
- Status - the state of the synchronisation process. Every process can have one of the following statuses:
- Queued - The synchronization is queued.
- Running - The synchronization is currently running. In this case, a progress bar appears in the synchronization row, indicating the number of rows processed out of the total.
- Failed - The synchronization was unsuccessful.
- Completed with warnings - The synchronization has completed, but the process encountered issues with some rows in the source document.
- Successfully completed - The synchronization has finished without encountering any issues with any rows in the source document.

- Total rows - The number of rows identified in the source document by the synchronization process.
- Processed rows - The number of rows handled by the synchronization process.
- Created - The number of new entries created by the synchronization process based on the source document.
- Updated - The number of existing entries in the system updated by the synchronization process based on the source document.
- Failed rows - The number of rows that failed due to missing required data or configuration errors between the synchronization and the source document.
- Start time - The exact date and time when the synchronization process began processing the source document.
- End time - The exact date and time when the synchronization process finished processing the source document.
- Details — the markers displayed in the "Details" column serve three functions:
- Color - Based on the color, administrators can immediately determine whether the synchronization process was successful. Green icons indicate success. Red icons signify failure. Orange icons indicate the process completed but encountered issues.
- Number - The number in the icon indicates the count of problematic rows encountered during the synchronization process. A zero always indicates success, meaning the synchronization process either found no rows in the source document or processed all rows successfully.
- Clickable - Each icon is clickable. Clicking on the icon opens the Synchronization Details modal, which provides detailed information about the results of the synchronization process.
- During the import of data from source documents, log entries can quickly accumulate on the Synchronization Log page. The search bar allows users to search the synchronization log by entering the synchronization name and clicking the magnifying glass icon next to the search bar. IMPORTANT: The Synchronization Log table can be sorted by ID, status, start time, and end time. The sorting functionality remains available even after performing a log search by name.
IMPORTANT: The synchronization log table can be sorted by ID, status, start time and end time. The sorting function remains available even after searching the log by name.
Synchronization Details Modal
Synchronization Details Modal As mentioned earlier, clicking on the indicator at the end of a synchronization log entry opens the Synchronization Details Modal. Let’s take a closer look at its contents in two scenarios: when every row in a synchronization is processed successfully and when some rows fail to process due to errors.
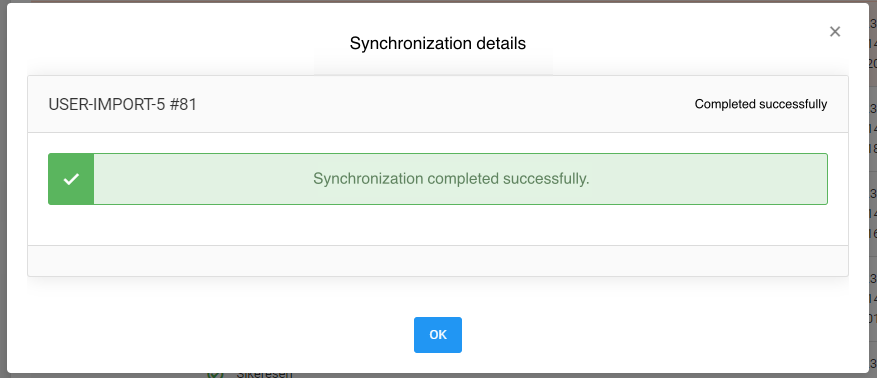
Synchronization Details Modal - Successful Synchronization
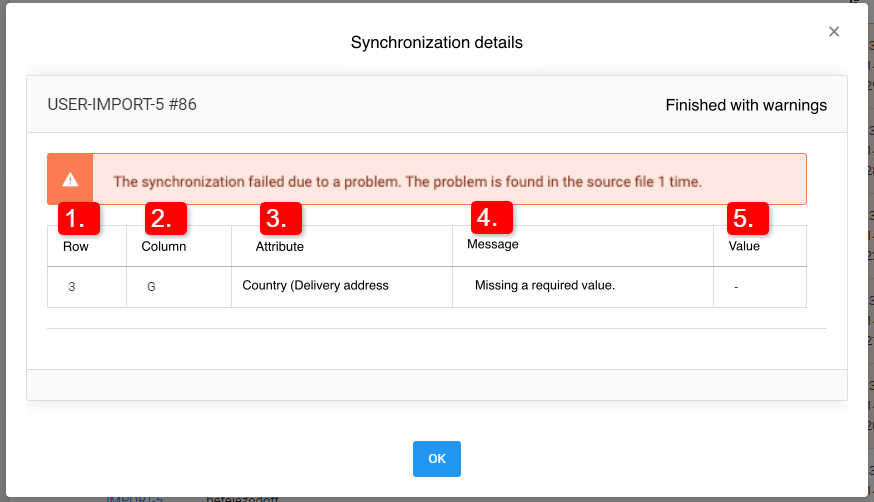
Synchronization Details Modal - Completed with Warnings
- Row - Refers to the row number in the source document where the synchronization failed due to certain issues.
- Column - Refers to the specific column in the source document where the problem was identified.
- Attribute - Refers to the field that the import process attempted to populate from the corresponding column in the source document when the issue occurred.
- Message - A brief explanation of why the row failed to synchronize. (In the example above, the "G" column in the source document was empty in the third row, where the synchronization expected a country name, as defined in the USER-IMPORT-5 synchronization settings.)
- Value - The value found in the "G" column of the third row in the source document during the synchronization process.
IMPORTANT: After reviewing the list of problematic rows in the Synchronization Details Modal, business owners must correct the source document, update the synchronization with the new source file, and either reschedule the synchronization or manually rerun it.