In this section, we will explore the remaining settings available on the General Settings administration page.
General tab
Under the General tab, store owners can configure the meta settings and other dynamic text that appears throughout the online store.
- Meta title – The title used for the homepage. The meta title is not visible on the webpage itself but is embedded in the page’s HTML code. Search engines use it to determine the relevance of the page’s content to a user's search query. A well-optimized meta title can help improve the website’s search engine ranking and click-through rate by providing a clear and engaging title that encourages users to click on the search result.

- Meta keywords – A comma-separated list of keywords added to the homepage’s HTML source code, related to the website's content for search engines.
- Meta description – A concise summary of the website’s content, displayed in search engine results. It provides users with a brief preview of what they can expect when clicking on the link. Similar to the previous meta settings, the meta description is also placed in the homepage’s HTML source code.
- Footer text – The footer text (if provided) appears above the general company information in the footer section of the website.
- Oversized product information (Product Page) – Any product item in the online store can be marked as "Oversized." If a product belongs to this category, the text provided here will appear on the product detail page for customers to see.

- Oversized product information (Cart Page) – Any product item in the online store can be marked as "Oversized." If the product in the cart belongs to this category, the text provided here will appear on the cart page for customers to see.
All of the above settings are language-sensitive, meaning they must be filled out for every active language used in the online store.
Site name
This setting allows you to easily modify the name of the webshop page, which appears in consent statements, the meta title, and other automatically generated texts.
User activation type
By default, every newly registered customer can activate their account via a link provided in the activation email, which our system sends after the customer completes registration.
Thanks to this setting, the store owner can decide whether they want to manually activate newly registered customers or allow newly registered customers to activate their accounts through a link provided in an email sent by the system.
Important: In the case of manual activation, registered customers will receive notifications about any changes to their account status.
Registration type
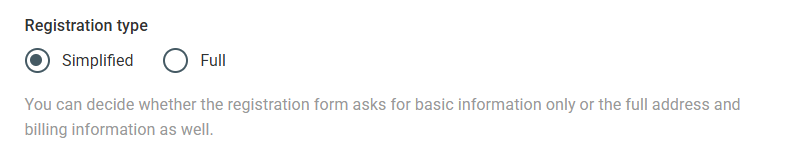
This setting allows the registration to be either simplified or full. The simplified registration requires basic information such as name, email address, and password. In the case of full registration, the system may request additional details such as contact phone number, country, postal code, city, address, company name, and tax number.
Disable registration
This setting allows the store owner to decide whether users can register independently on the site or if only the administrator can add new users via the admin panel.
Two-Factor Authentication for Login
To enhance security, access to the admin panel can now be protected with two-factor authentication (2FA). During login, administrators must enter a unique code sent via email to confirm their identity. This security feature can be enabled, ensuring that administrators can only access the system after entering the email-generated authentication code. This option is available in the general settings:
Order Notification Email Addresses
It is possible to separate order notifications for wholesale (B2B) and retail (B2C) customers. Different email addresses can be assigned for B2B and B2C order notifications, allowing the webshop owner or operator to manage orders from the two customer groups separately. If the B2B notification field is left empty, the system will automatically send wholesale order notifications to the main notification email address.
Settings tab
In the first chapter, we already covered some settings from the Settings tab.
Let’s now explore the additional settings that can be configured on this page for your Sellvio online store.
- Default tax – The tax applied to products, which can be specified as either a whole number or a decimal value.
- Currency – The currency used for pricing products.
- Number of decimals, separators – Formatting settings that affect how product prices are displayed.

- Sending a delivery notification to the customer – The system can be configured to automatically send a notification email to the customer after successful delivery.
- Tax type - It can be set whether the owner is VAT exempt. If enabled, invoicing is done with 0% VAT.
- Abandoned cart notification — warns customers if they are about to leave the site with a non-empty cart.
- The function settings allow specifying separately who should receive notifications about abandoned carts: For guest users - visitors who are not registered but have added products to their cart. For registered users - logged-in users who did not complete the order.
- For guest users - users - visitors who are not registered but have
- For registered users - users - logged-in users who did not complete the order.
- The timing of sending notifications is fully customizable, allowing precise control over when users receive reminders: Notify email is sent after - you can define how many days after cart abandonment the system should send the reminder email. For example, if set to 3 days, the notification will be sent on the third day after the cart was abandoned. This allows the reminder to be timely without being too intrusive. Email sending time window - a start and end time can be defined during which the system is allowed to send notifications. This is especially useful if you do not want messages to arrive, for example, during the night. For instance, emails can be configured to be sent only between 09:00 and 20:00, ensuring users receive notifications at appropriate times when they are more likely to respond.
- Notify email is sent after - many days after cart abandonment the system should send the reminder email. For example, if set to 3 days, the notification will be sent on the third day after the cart was abandoned. This allows the reminder to be timely without being too intrusive. Email sending

- and end time can be defined during which the system is allowed to send notifications. This is especially useful if you do not want messages to arrive, for example, during the night. For instance, emails can be configured to be sent only between 09:00 and 20:00, ensuring users receive notifications at appropriate times when they are more likely to respond.
- Order print settings – you can choose whether product images or customer notes appear on printed orders.
- Default webshop warehouses - you can configure which webshop warehouses are visible to users and which are used for stock calculation.
- Bank transfer template - if this function is enabled, a sample bank transfer template is attached to the order confirmation email to help users correctly fill out the transfer form. The fields configured here serve as default values and automatically populate the bank transfer template. For proper operation, all fields must be filled in, including company details found on the first tab (General).

- Default product sorting - this setting allows you to define the default order in which products appear to customers on product listing pages (selectable options: Default, Name ascending, Name descending, Newest products, On sale first, Price ascending, Price descending, Available first, Availability ascending, Availability descending, Product code ascending, Product code descending).
- Default products per page limit - this setting allows you to define how many products (20, 40, 60, or 160) are displayed by default to customers on the product listing page. The system remembers the value selected by the visitor and automatically applies it during future visits as well.
- Hide cart button when
- option is disabled, customers can still add products to their cart and place orders even if the products are not in

- is enabled, customers cannot add out-of-stock products to their cart. Instead, the "Add to cart" button is automatically replaced with an "I'm interested" button, allowing users to express interest in the product. The system automatically sends an email notification to the customer when the product is back in stock. It can be enabled separately for B2B and B2C users.
- User functions – the product comparison page and the product export function can be configured for logged-in visitors.
- Free delivery product settings – configure products whose purchase reduces the shipping cost to 0. This appears as a pop-up on the cart page, and you can also set the shipping costs for extra products to be reduced to 0 as well.
- Print products - By enabling this function, users can download product data from the website. This is accessible on the product page as the last item among the share buttons.
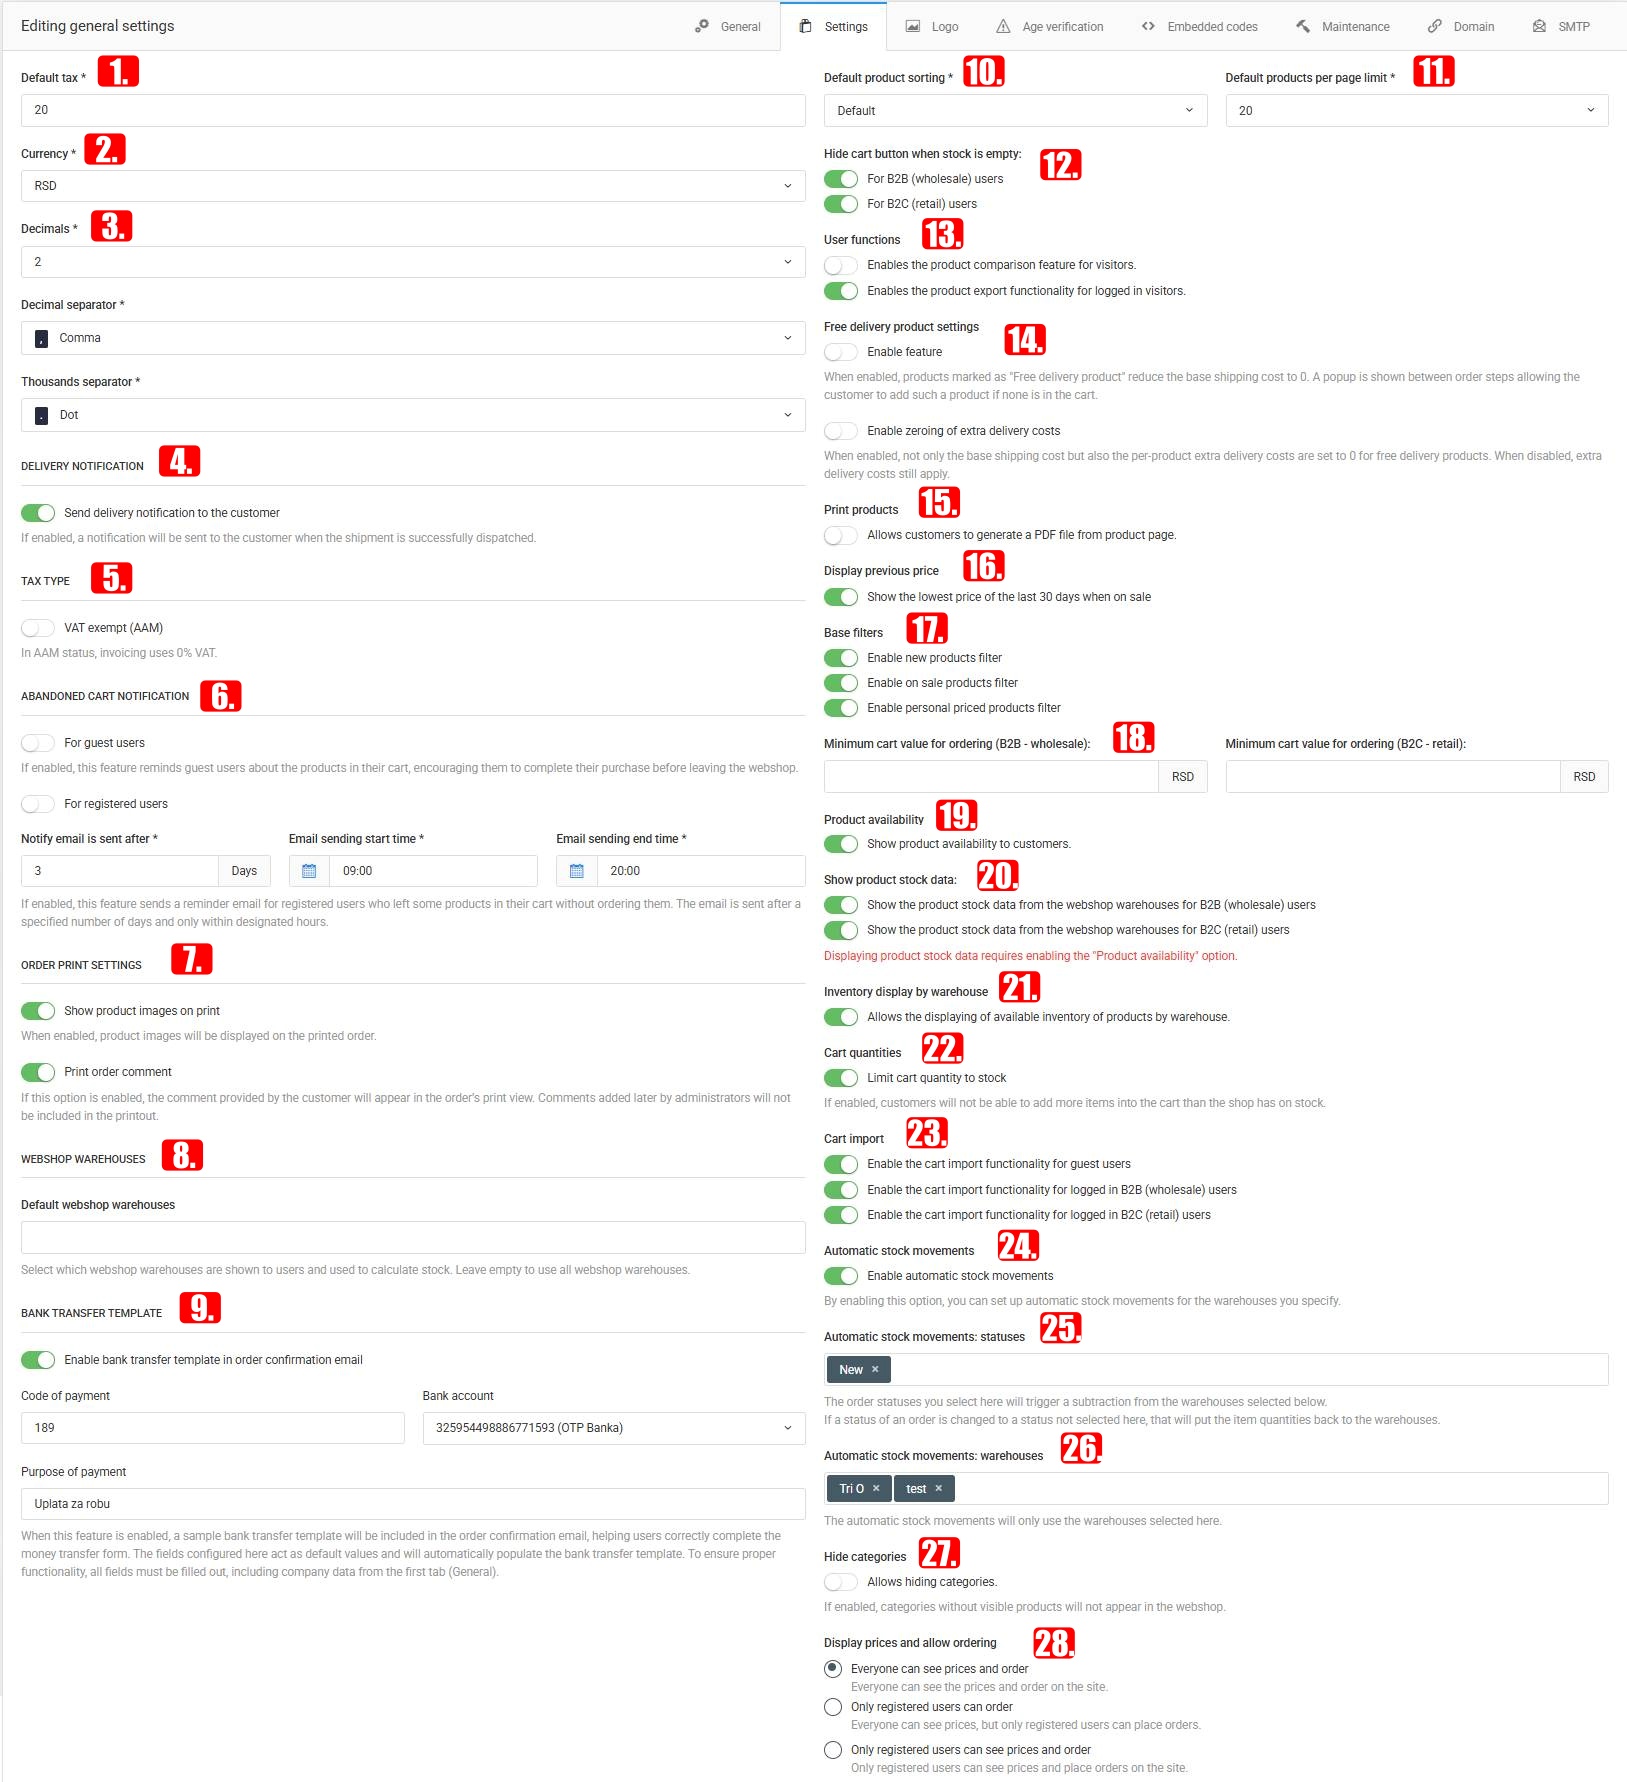
- Display previous price – The lowest consumer price from the previous 30 days can be displayed for discounted products. (The lowest price is shown only if the product has a discounted price and a recorded price history.)
- Basic filters – These filters are displayed by default on the webshop interface, allowing quick filtering of new, discounted, and specially priced products.
- Minimum cart value for ordering – we can specify a threshold below which orders cannot be placed. This can be set separately for wholesale and retail customers.
- Product availability – by enabling this option, customers can see on product list pages, the homepage, and related product sections which products are in stock and which are not.

- Show product stock data – If you enable this option, customers can see the exact stock status of products. To use this setting, the „Product availability” option must also be enabled. It can be enabled separately for B2B and B2C users.
- Inventory display by warehouse - allows the available product quantities to be displayed per warehouse. Only those warehouses will appear on the site where the "Webshop warehouse stock" option is activated.
- Cart quantities - if enabled, the system automatically takes stock levels into account when limiting the quantities that can be added to the cart. This prevents customers from adding more items than are actually available.
- Cart import - authorized users can download a template file on the Cart page, where they can enter the products they want to upload by specifying item number or EAN code and quantity. By uploading the completed template, the products are automatically added to the cart.

- Automatic stock movements - By enabling this, automatic stock movements can be configured for the specified warehouses. However, for the feature to work, it is necessary to select an order status that triggers the product movement, as well as at least one warehouse.
- Automatic stock movements: statuses - The selected order statuses trigger stock deductions from the selected warehouses (for example, if the "Paid" status is selected, the deduction will only occur when the order status changes to "Paid"). If the order status is changed to a status not selected here, the product quantities will be returned to the warehouses.
- Automatic stock movements: warehouses - Automatic stock movements take into account the selected warehouses. The system determines from which warehouse the stock should be deducted first based on the specified order.
- Hide categories - If enabled, categories without visible products will not be displayed.

- Display prices and allow ordering - with this setting, you can restrict who can purchase and who can see prices on your site. It is possible to allow purchases for all customers or only for those who are registered and logged into their user account.
At the bottom of the Settings page, you can configure the automatic messages that are sent out for different order statuses. These messages can be in email format and/or SMS messages (if administrators set up an external SMS sending service). For more information on configuring external email and/or SMS sending services, you can read more at this link.
In a previous chapter, we discussed the default built-in order statuses in Sellvio, and how store owners can edit existing order statuses or add new ones to customize their order management workflows.
In this section, store owners have the opportunity to further customize their order statuses by associating static content (static pages) with any of the existing order statuses.
The content of the assigned static pages will be included in the automated emails and/or SMS messages sent to customers for various order statuses.
This level of customization can help build trust between the store and its customers, as it ensures that customers are continuously informed and up-to-date about their orders.
In the next chapter, we will dive deeper into how administrators can create the necessary static content.
The online withdrawal feature is now available in the Sellvio system, accessible to customers through the website footer. After entering the basic order details, customers can easily submit a withdrawal request, even on an individual order-item basis. For logged-in users, the system automatically pre-fills the available information, making the process faster and more convenient. Once the withdrawal request is submitted, the administrator receives a notification and can begin processing the request accordingly.
Embedded Codes Tab
The configuration options on this page might seem a bit unclear and complex, but we will try to explain them in the simplest way possible.
Certain third-party services, such as Facebook Pixel or Google Analytics, may require store owners to place a specific code snippet in the website's header or at the end of the source code's body section.
The fields on this page simplify this process without requiring further development.
As mentioned above, both fields correspond to specific sections of the displayed HTML code.
- Header scripts – The code snippets entered into this field will appear on every page in the header section of the web store’s HTML code.
- Footer scripts – The code snippets entered into this field will be inserted at the end of the body section, just before the footer, in the displayed HTML code of every page of the web store.
Typically, most third-party services provide specific instructions on where the store owner should place the code snippet.
Maintenance Tab
The settings on this page allow the store owner to temporarily place the website in maintenance mode. As long as the maintenance mode is active, visitors will not have access to the web store. Instead of the store’s homepage, visitors will be greeted with a welcome screen explaining that the site is still under construction and currently unavailable.
- Language – Select the language in which you want to define the title and message that will appear on the maintenance page.

- Title – The title of the maintenance page.
- Message – The message that will be displayed to visitors on the maintenance page.
- Active – Enable or disable maintenance mode.
- Show quote – Enable or disable the display of random (English) quotes on the maintenance page.

- Access code — with this access code we can bypass maintenance mode and reach the site immediately.
- Option 6.A – Using the first white background button, you can automatically generate a code, or you can provide any custom code.
- Option 6.B – Using the second gray button, you can copy the full link to the clipboard, which allows access to the page. Anyone who receives this link will be able to access the page by bypassing maintenance mode.
- Allowed IP addresses – By clicking the "Add" button, you can specify IP addresses that will bypass maintenance mode. While the access code allows access via the copied link, the system will automatically recognize the IP address and allow access.
As long as maintenance mode is active, visitors to the web store will see the following page: