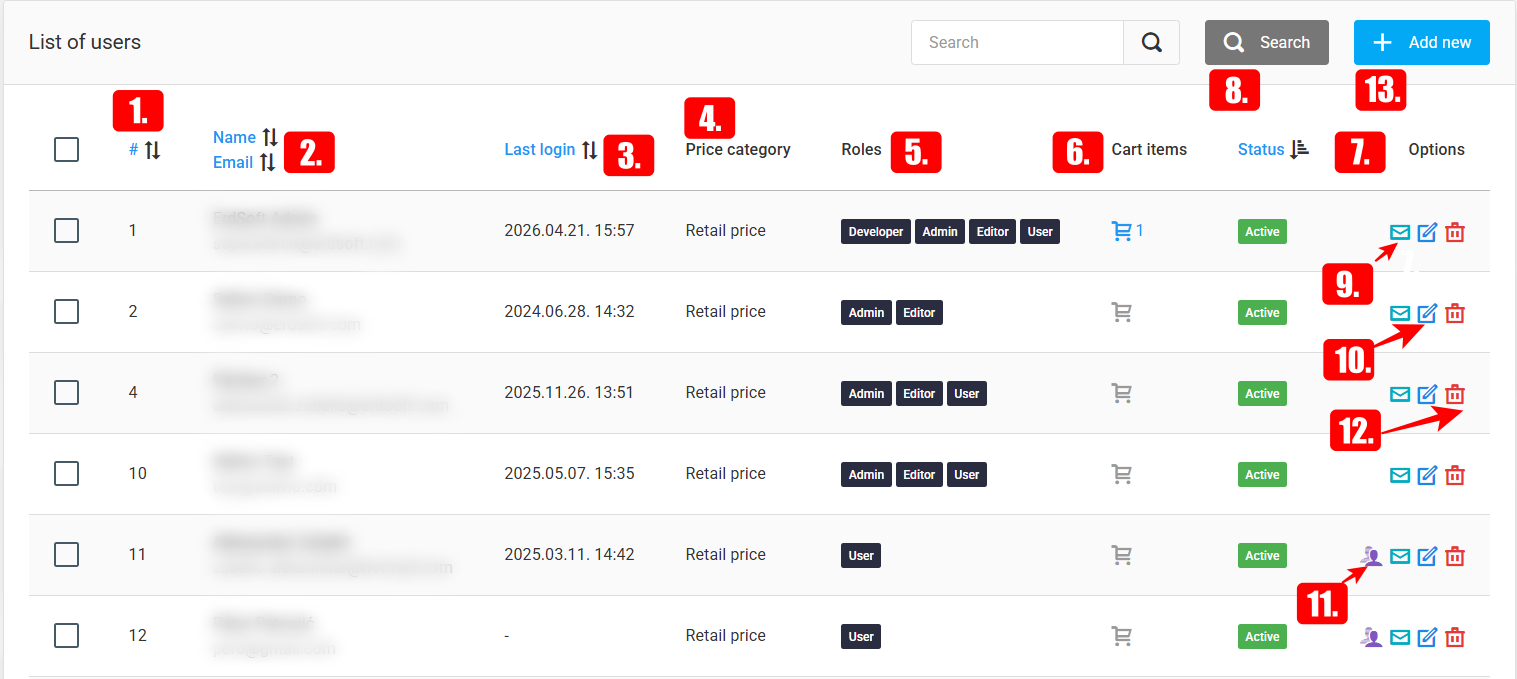
The Users administration screen can be accessed from the admin dashboard under User Management → Users.
Identifier - the unique identification number of the user.
Name and email - the user’s first and last name, as well as their email address.
Last login - the user’s most recent login to the webshop.
Price category - the pricing level assigned to the user (Retail/Wholesale).
Roles - the list of groups assigned to the user. A user can belong to multiple user groups.
Cart items - shows whether the user has products in their cart and how many items are in it.
Status - indicates whether the user account is active, pending activation, or disabled.
Clicking on the search field displays the search interface.
Administrators have the option to send a password reset link if needed for a user.
By clicking the "edit" button, existing users can be modified.
Webshop administrators have the ability to log in as a user, allowing them to directly view the interface from the customer’s perspective, resolve issues more efficiently, assist with the ordering process, and ensure that various discounts and offers function properly.
Using the "delete" button, users can be removed.
By clicking the "Add New User" button, administrators can add new users to the system.
In order for the function described in point 11 to become available, as an Administrator you must enable the "Use impersonation" permission on the permissions tab.
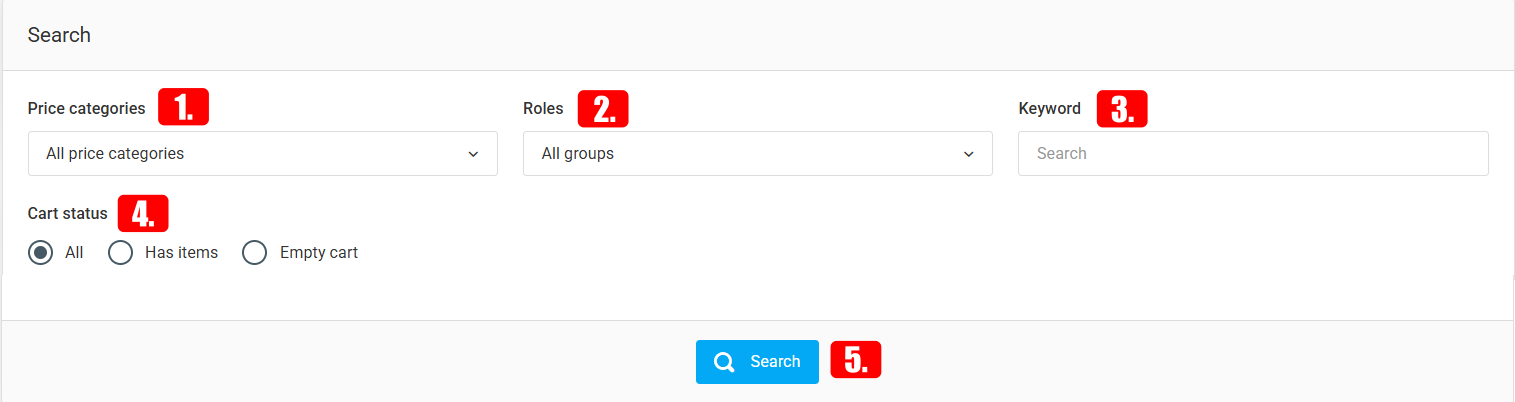
When clicking on the search field, the following options appear:
- Price categories – Users can be filtered by pricing type (Retail / Wholesale)
- Roles – Users can be filtered by groups (Administrator / Developer / Editor / User)
- Keyword – Users can be filtered based on custom keywords
- Cart status – Users can be filtered based on the status of their cart
- By clicking the Search button, the filters are activated and the searched users are displayed
- Adding or Editing Users
There are two ways to add new users in Sellvio. The first method is through webshop registration, where registered users are automatically assigned to the Users group. The second method allows administrators to create new users via the User Management → Users section on the administration screen.
IMPORTANT: Only users belonging to the Administrators user group can manage and create new users in Sellvio.
There is no limit to the number of users that can be created.
General Tab
Creating a new user in Sellvio is straightforward. Simply fill in the required fields on the General Tab and click the "Submit" or "Submit and Stay" button at the bottom of the screen.
- Name – the user’s full name (first name and last name).
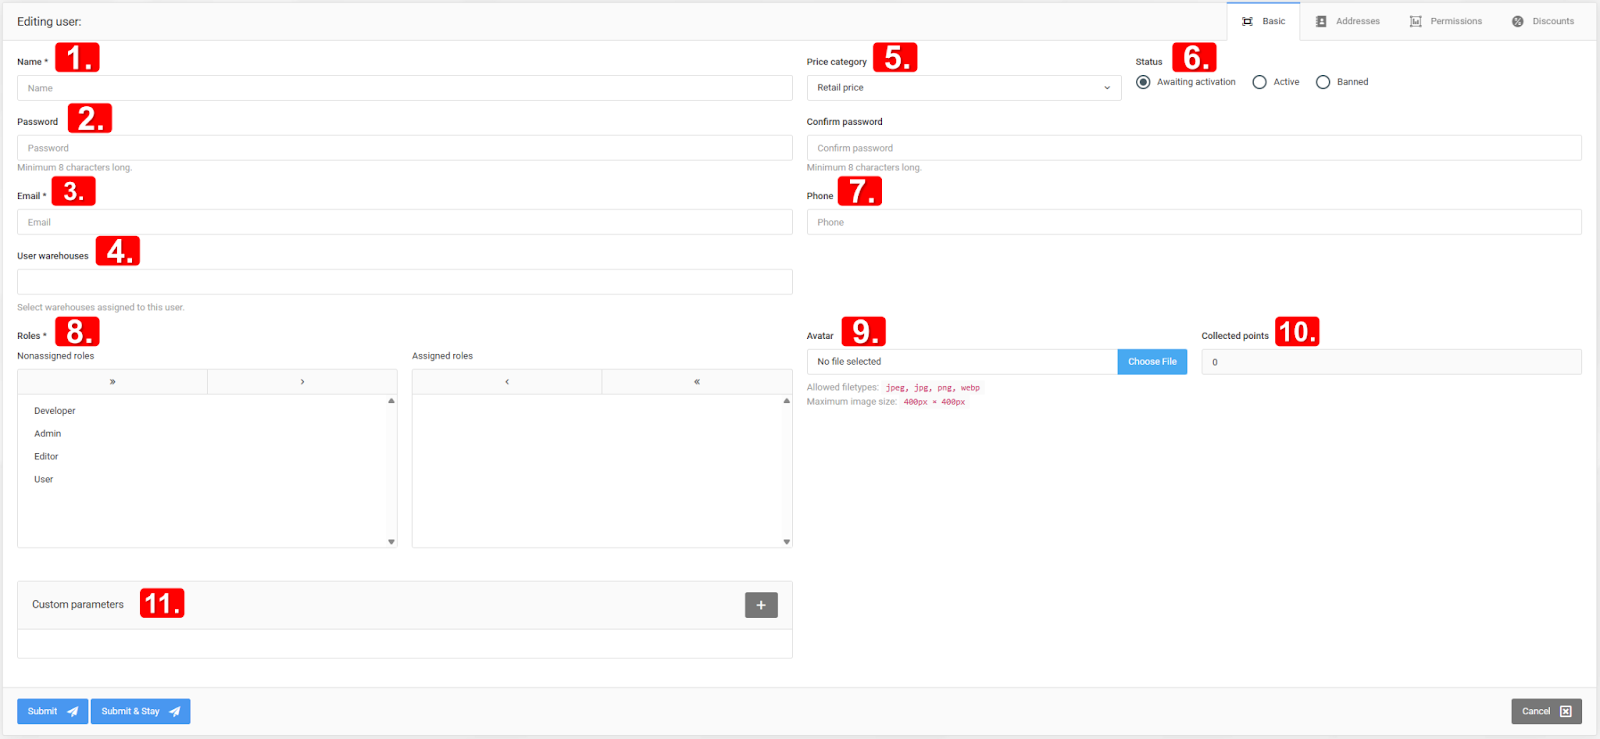
- Password and confirm password – the password required for login. The password must be entered twice to avoid typing errors.
- Email – the user’s email address, which is used together with the password for login.
- User warehouses – only the selected warehouses will be visible to the user.
- Price category – the price list from which product prices are displayed after the user logs in. Sellvio includes two default price lists: wholesale and retail.
- Status — For users, one of three statuses can determine whether login is permitted:
- Awaiting activation – inactive users cannot log in. Users who register in the webshop remain inactive until they activate their account by verifying their email address.
- Active – active users can log in. Users who register in the webshop and confirm their account by email verification are automatically set to active status.
- Banned – this status can only be set by an administrator. Blocked users cannot log in.
- Phone – the user’s primary phone number.
- Roles – users who register in the webshop are initially added to the Users group. Administrators can assign them to additional user groups at any time by moving the desired role from the Unassigned roles field to the Assigned roles field.
- Avatar – the user’s profile picture (used only within the administration interface).
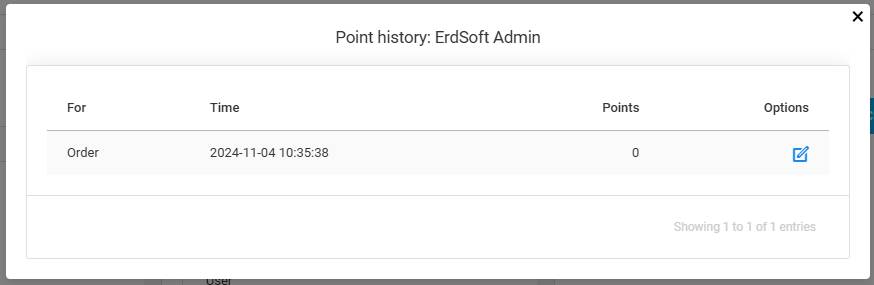
- Collected points (read-only) – displays the user’s accumulated loyalty points based on purchase history. If the user has previously made purchases in the store, an “info” button appears next to the field. Clicking the “info” button opens the points history window, which contains a list of the user’s previous purchases and details of the number of points earned for each order.
- Custom parameters – The parameters specified here can be used in the search on the admin interface, allowing users with these attributes to be filtered quickly and easily.
Addresses Tab
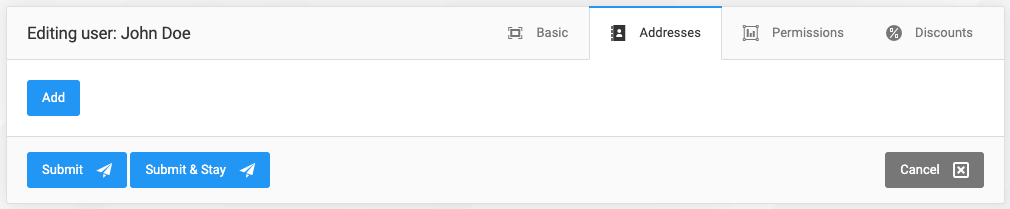
The Addresses tab displays the stored addresses of users, which can either be added by the users themselves via their profile page in the webshop or assigned by administrators using the administrative interface.
There is no limit to the number of addresses a user can have.
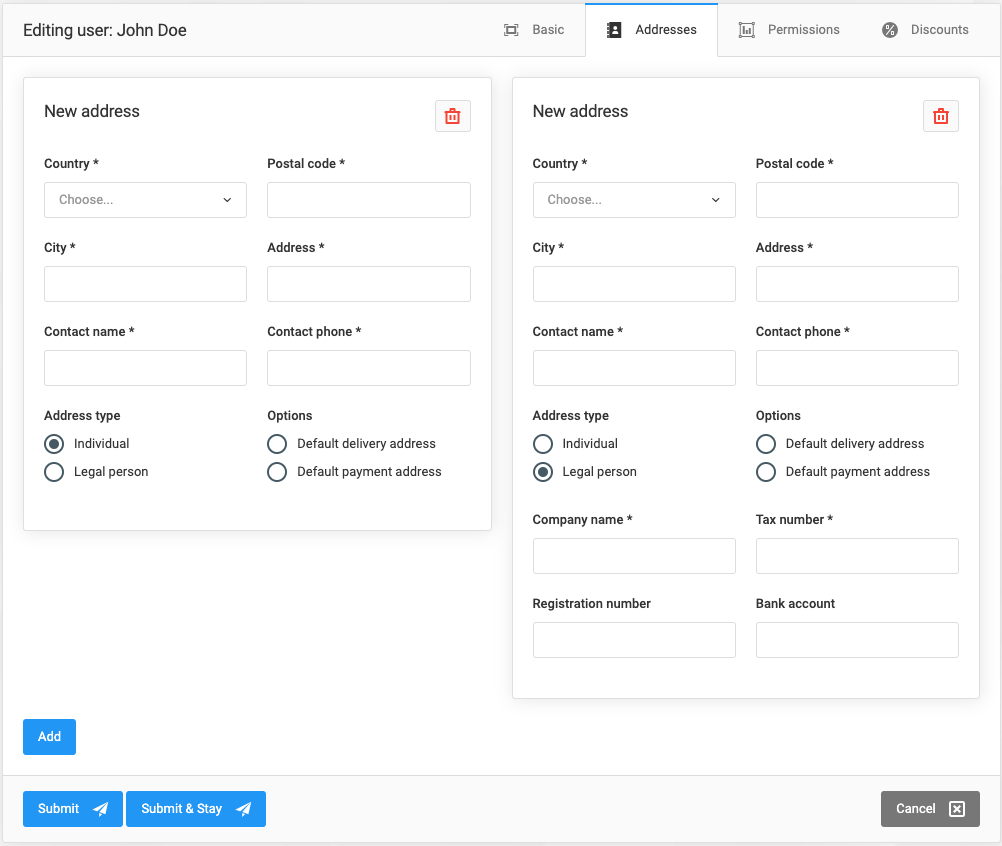
To add a new address to a user, first click the "Add" button.
Addresses can be classified as either corporate or personal. However, since the field descriptions are self-explanatory, we will not go into further details about each field.
Permissions Tab
To enhance security, Sellvio employs a "restrict everything" approach regarding permissions.
This means that when a new user is added to the system and assigned to a user group, they initially have no permissions to access any module or functionality within Sellvio. Permissions must be granted step-by-step by administrators.
User groups function as collections of permissions tied to various Sellvio modules. For instance, a user assigned solely to the Editors group will only have permissions to manage website content and will not have access to user administration, as those permissions are reserved exclusively for the Administrators group.
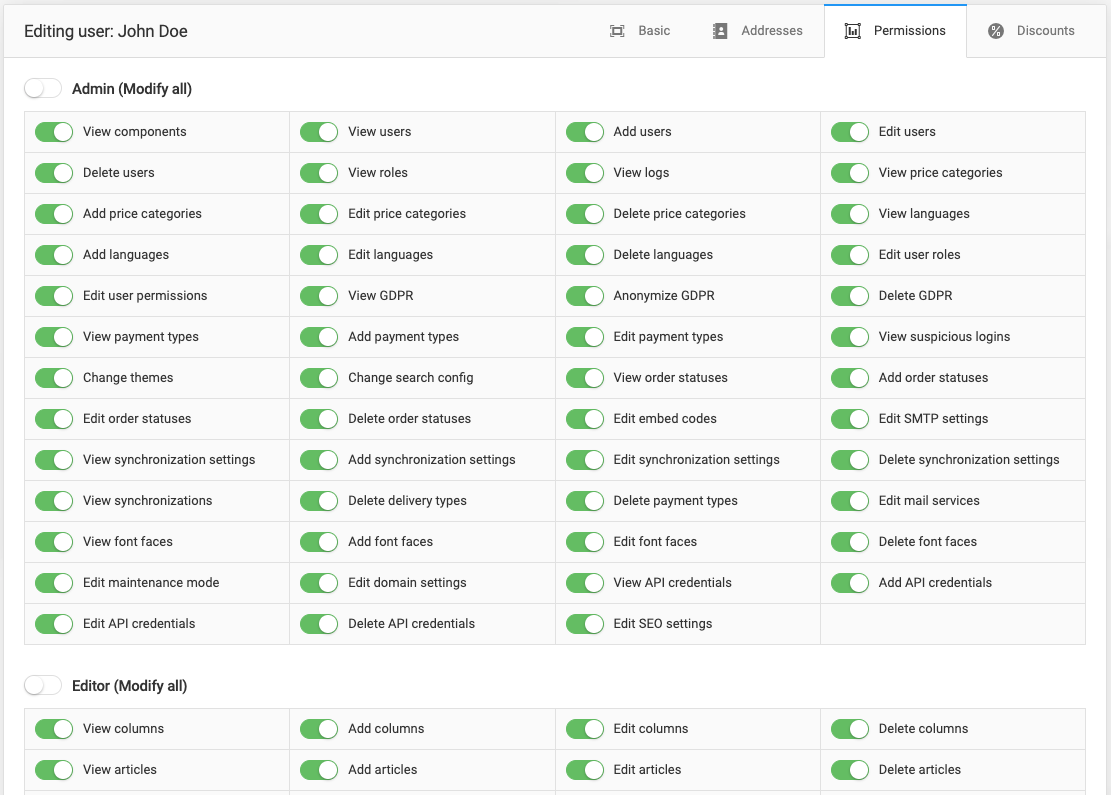
What further strengthens the robustness of the permission system is the ability to assign create, read, edit, and delete permissions individually at the user level.
It would take a significant amount of time (and ink) to review every single permission change in detail.
As previously mentioned (and shown in the screenshot), the permissions screen offers separate create, read, edit, and delete permissions for various Sellvio modules, organized into user roles. Administrators can use the permissions screen to configure detailed permissions for users based on business requirements.
Discounts Tab
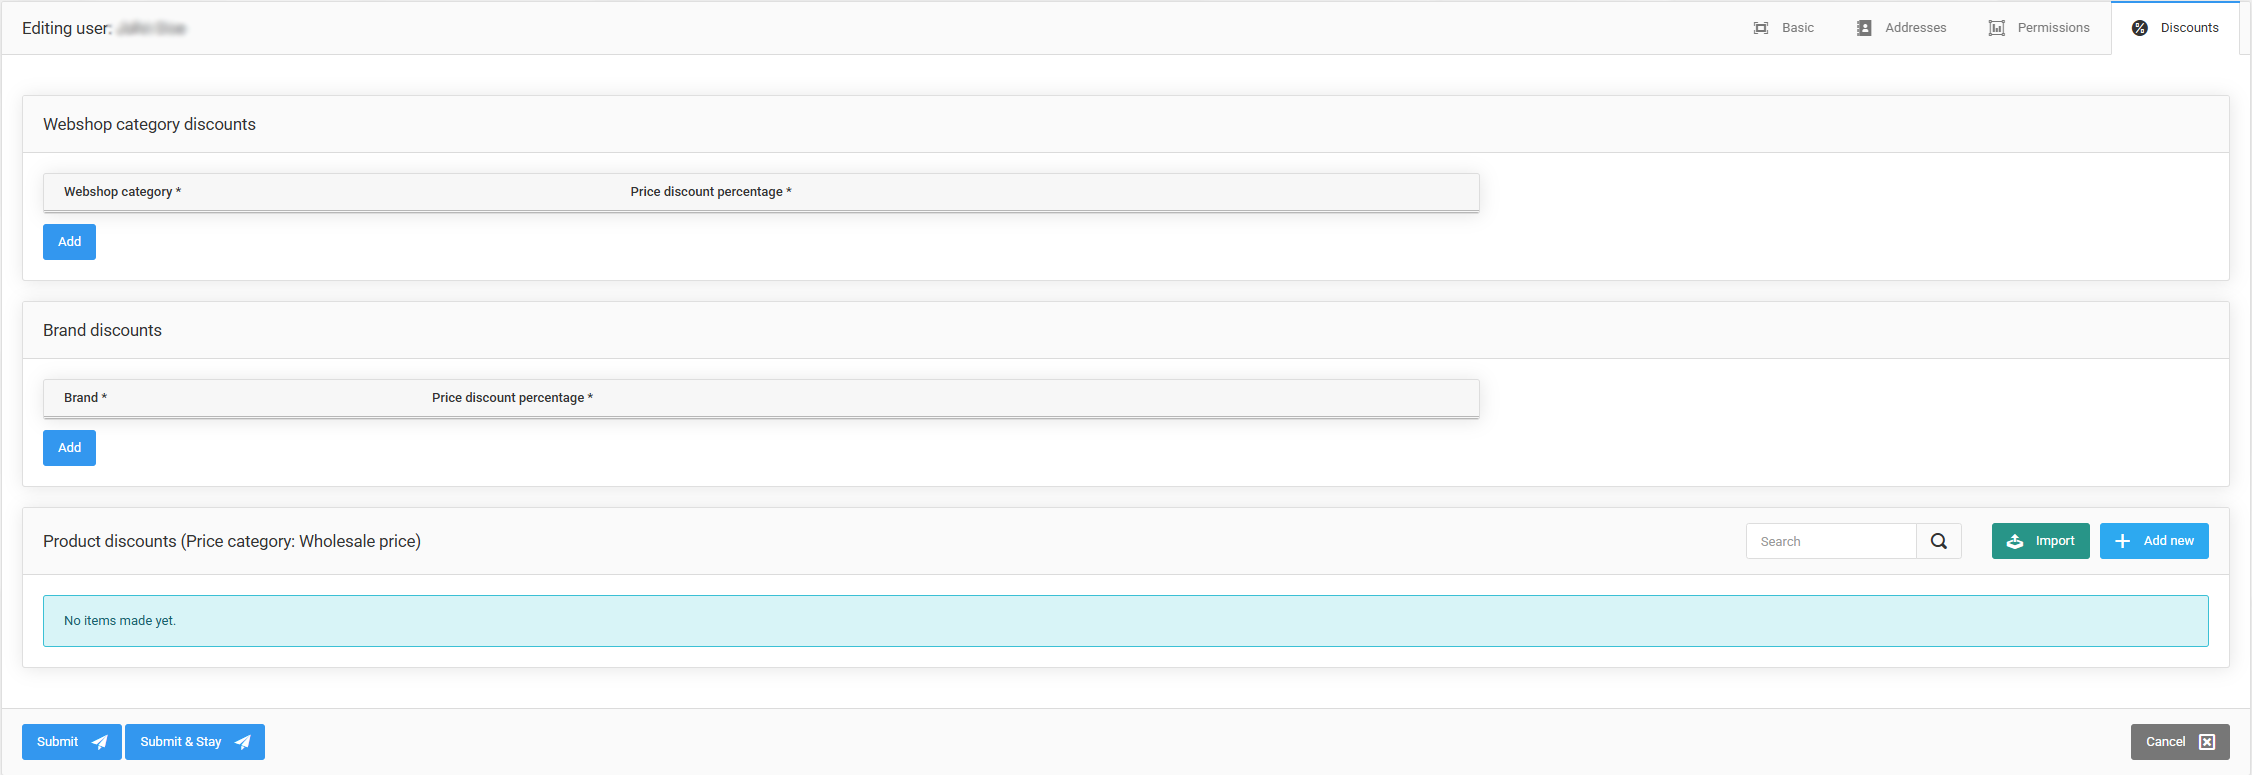
Within Sellvio, there are numerous methods for creating discounts, one of the most unique types being User Discounts.
User discounts are assigned individually for each user through the Discounts tab in the user settings.
User discounts are percentage-based and can be applied to product categories.
To grant a discount to a user for a specific product category, manufacturer, or individual product, simply click the "Add" button, then select the appropriate category from the options listed in the Webshop Category column, and enter the discount percentage in the Discount Percentage column.
The maximum number of entries that can be created is determined solely by the number of available product categories.
With the help of import, it is easy to set that a specific customer receives a discount on selected products. During the import process, a list of products and their corresponding discount percentages can be provided, allowing large amounts of data to be uploaded quickly.
NOTE: Administrators can provide a discount for the entire webshop by selecting the "All Webshop Categories" option in the Webshop Category column.
NOTE: If two discounts conflict, the system will always apply the higher discount.